Pricing

Long Arm Quilting/ Sewing or Quilting Lessons / Custom Made Items
I am a long arm quilter with rates starting at $.018/square inch. Most edge to edge designs are $.021/square inch. My prices include set up, thread, needles, etc. I make commissioned quilts with rates at $20/hour.
I also teach Private Sewing Lessons in the St. Louis area. Cost is $50/hour.
Please e-mail me with any questions, to have your quilt top quilted, to set up sewing lessons, or regarding having something custom made, at showmesewing@gmail.com.


Tuesday, November 30, 2021

Naomi's Trapezoids Quilt for Refugees (#2)


Quilt top made by Naomi R. The pantograph I used was Hall of Mirrors (Urban Elementz) using light yellow thread.
 

Monday, November 29, 2021

Lisa C's Blue, White, Multi-colored Scrappy Quilt for Refugees


Refugee Quilt #4 top made by Lisa C. I quilted it with light blue So Fine and Bottom Line thread using the Ripples pantograph by Urban Elementz.
 

Note: quilts 1-7 have already gone to a family.

Monday, November 22, 2021

How to Make a Quilt Label - Tutorial

I was asked how I did quilt labels. Quilt labels come in many shapes and sizes with minimal to a lot of information on them. I have tried different ways, and this is the way I revert back to in most cases. However, for privacy reasons don't feel I can show some of my better labels since they have the persons' names on them and I have not asked permission to post them. 


I almost always put my labels on the back of the bottom right side of the quilt, which means the quilts above, I did on the wrong side. But it shows a very simple label hand sewn a short distance from the binding which is what I wanted you to see.
For more special quilts, I will frame the label, either with fabric (as shown in these two eagle quilt labels) or with a frame drawn on the label.

Still other times, I have made the label and sewn it on the quilt back before I do the quilting. This has the advantage that there is no hand sewing (which I dislike). But it has the distinct disadvantage of putting the label in the wrong place. I have made the mistake of carefully placing my label, then loading the quilt incorrectly which put the label sideways on the top left side. And of course it was done before the quilting, so there is no easy way to take it off and put it on again. Again, good if you don't want it removed, and bad if you made a mistake. In the case of the one pictured below, it is facing the right way, and nicely sewn and quilted down, but I would have preferred for it to be closer to the bottom of the quilt.


So, here is my tried and true method.  I start by typing it up on the computer. I can spell check, edit, change fonts and do whatever I need to do so it looks the way I want. Remember to have at the very least, who made the quilt, who quilted it, where and when. Adding the why, name of pattern, etc. are nice and helpful for the quilt historians. 


Then, using a light table/box and fabric markers, I trace the information on usually white or off white cotton fabric. Little tiny pieces of tape help hold things in place while this is done. You can also stick the tape first to your clothes before using it, so it doesn't stick so fast you fray the edge of your label when pulling the tape off.


Now cut it to size. I allow 1/2" from all sides of the writing which will leave, once seams are taken, 1/4" margin. As you cut, not only line up with the writing, but also the already cut edges so you have it squared.


Then press the edges. If you followed my measurements above, you shouldn't need an ruler to iron. Just fold the raw edges up to the edge of the writing and that should be your 1/4" seam allowance. 


Press. You also want the heat of the iron to set the ink on the writing, so make sure in the end to press the whole thing. In some cases, you want all 4 sides turned under (like all the labels at the beginning of the post). Those will look like the one on the far left here.


But some you might want to sew in such a way that the binding catches 2 of the sides as I will show you below. If so, you will want to press only the top and right side of the label (as shown in the right 2 tan labels).


The label with only two sides ironed under will be place to the edge, or 1/8" from the bottom left-hand corner of the back of the quilt (which will be the back of the bottom right). Since I use a 2-1/2" double fold binding, I place the label 1/8" from the edge so when I sew the binding down at 3/8," it will only cover 1/4" of the label, keeping the words centered. I suppose I could cut the label with a little more room on the bottom and left sides to compensate, but this works best for me. 


I then hand sew the two folded under edges to the quilt as invisibly as possible. My favorite stitch is the ladder stitch. Yes, I am a lefty, so I start from the left and sew right. If you are right handed, you will obviously want to start on the right and sew left.


Here, I'm trying to show that to hide the stitching as well as you can, where the last stitch ended on one side is where the stitch on the other side begins. Take little stitches. How big? I have always tried to imitate the size of stitch the sewing machine takes so it holds fast.


My preference has always been to sew the binding to the back of the quilt, fold to the front and carefully stitch right near the edge of the fold on the binding. I feel I make it look better that way than any other way I've tried, and I have tried many other ways. Yes, there is stitching near the binding on the back of the quilt, but I find that less distracting than sewing the binding to the front, folding over and stitching in the ditch on the front and ending up with varying between a nice stitch on the back with missing the binding in places and having too much of a seam in other places. That method looks more wobbly to me, so I'll stick with this.

Saturday, November 20, 2021

Naomi's #1 Quilt for Refugees


When I mentioned on one of my quilting facebook groups that I had offered to quilt tops my friends made for free to give to the refugees, I had several people offer to send me tops. Naomi was quick to send me 6 tops! This is the first one quilted from her stack.


I quilted it with light yellow So Fine and Bottom Line thread using the Kindling pantograph by Urban Elementz.
 

Friday, November 19, 2021

Turning Twenty Just Got Better Quilt for Refugees


Here is another quilt I made for the refugees. This pattern (I believe) is called Turning Twenty Just Got Better and made with fabric from my stash. 
 

I quilted it with the Zest (Urban Elementz) pantograph in light yellow So Fine and Bottom Line threads. It is finished with a scrappy binding.

Wednesday, November 17, 2021

Lisa P's Turning Twenty quilt for the refugees

 I sent out a plea to my friends on Facebook and some of my quilting Facebook groups to help make quilt tops for the surge of refugees arriving in the next few months. I would, of course quilt and bind them for free. I had an overwhelming response. Within the first week I had several offers, plus a dozen or so back to me by the week's end with more promised. I bought a nice big roll of batting and got started on the ones that sent backs with them. For the others I would piece the rest of the backs. However, another friend saw some new sheets at an estate sale and purchased them for backs, so I will have fewer backs to come up with myself. There are so many good people in this world!


The first to offer to help was Lisa P.  I had offered to give the fabric if anyone wanted it, and she took me up on the offer.  I gave her the Turning Twenty pattern and the 20 fat quarters of fabric and she brought me back the top.


I used a free pantograph pattern from Urban Elementz called Plumeria. The thread I used was light yellow So Fine for the top and Bottom Line for the bottom.

Friday, November 12, 2021

Cathy's Stars and Squares Quilt


Beautiful quilt made by Cathy which she asked me to quilt. It is quilted with white So Fine and Bottom Line threads in a simple all over meander pattern. 
 

The batting used is Pellon Cotton and has a lovely drape.

Wednesday, November 10, 2021

Turning Twenty Quilts #2 and #3 for Refugees in Country Colors


A neighbor of mine asked me if I wanted to contribute supplies for the incoming refugees with their church. What else would a quilter want to do, but to help them with their "blankets" need. I made 3 quilts. One of which I posted here. I then posted on Facebook asking if anyone else wanted to make tops which I would quilt for the refugees. Within a week, I had received 18 tops with a promise of around 8 more. Looks like I have my work cut out for me. Aren't quilters the best!? Over the next several weeks you will get to see all those quilts.
 

Here's quilt #2. This is quilted using the pantograph Petal Flambé from Urban Elementz and using light pink thread from So Fine on the top and Bottom line on the bottom.


The back was pieced using fabric that was given to me and I pieced together to make it work. I like the effect.


Quilt #3 below has some brighter colors, but still many with the muted country feel.


This pantograph is called Cardamom Wave by Urban Elementz using the same light pink threads as in the quilt above.


The back is again pieced using donated fabric and leftovers from the top with a scrappy binding.

Tuesday, November 9, 2021

Pillow Sham Tops to Match Cathy's Falling Charms Quilt

 Using the leftovers from her Falling Charm's Quilt (posted here), Cathy made 3 pillow shams, or what will be pillow shams, and asked me to quilt those tops exactly as I did the quilt. I had them back to her the next day. Pantograph is Modern Twist by Urban Elementz, using white So Fine thread on the top and white Bottom Line thread on the back.


With a humility block to boot. ;-)

Friday, November 5, 2021

The Rabies Quilt from "The Office"

In the show "The Office" Season 4, episode 1, Phyllis makes a quilt, or rather, she starts a quilt to aid the quest to raise money for rabies awareness. Her three squares are shown for a second or two, but from that, I was commissioned to make a quilt - to finish what Phyllis started.


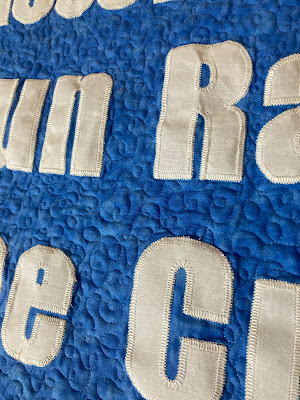
Now, as I examined that screenshot, I wondered how it was that a person talented enough to make the appliqués look so good sewed the squares together with crude "X" stitches with the batting sticking out, but it is obviously a prop and very unrealistic. But, regardless, I made the quilt, adding the name of their race, and a couple other squares to fill it out.


Here are close ups on some of the squares and the "X's" in the sashing and borders where I attempted to make it look like the uneven stitches Phyllis did. Of course, right after finishing sewing all the "X's" (3 times each to make them more visible), it occurred to me that instead of having the "X's" touch on the top, I should have deliberately extended them from time to time to make it more wonky. Oh, well. What's done is done.


Some small loops around the words brought the extra fulness, caused by all the appliquéd letters, back under control. All in all, it looks like we wanted it to, the client was happy, so it's a success. If I'm ever asked to make another one, I now know how long it would take 50+ hours, plus quilting.