Pricing

Long Arm Quilting/ Sewing or Quilting Lessons / Custom Made Items
I am a long arm quilter with rates starting at $.018/square inch. Most edge to edge designs are $.021/square inch. My prices include set up, thread, needles, etc. I make commissioned quilts with rates at $20/hour.
I also teach Private Sewing Lessons in the St. Louis area. Cost is $50/hour.
Please e-mail me with any questions, to have your quilt top quilted, to set up sewing lessons, or regarding having something custom made, at showmesewing@gmail.com.


Monday, February 22, 2021

Nate and Jenny's Quilt


 This is the third of the 3 quilts Jenny commissioned for her family. This one for her and her husband. She knew she wanted it to be gray and yellow, so we worked to find exactly what she would like. I made a pattern and bought the fabrics. Most of the yellow and gray fabrics are from a Laura Ashley collection.


I quilted it with the Filigree pantograph pattern I made. I LOVE IT!

Saturday, February 20, 2021

Meandering Thoughts "Water Lily Park" Quilt for Tamia


I'm a planner - I like to plan well in advance so I know what I'm doing. We have a rotation for who we give to at Christmas in our family (brothers, sisters, parents).  It make it easier to plan and we don't have to get together for a drawing. Back in the fall of 2017, I knew I would be giving to my sister Tamia for Christmas in 2 years and was deciding what I would do when I saw a quilt kit that screamed Tamia's name. I remember as a kid seeing DaVinci's Starry Night on her bedroom wall and I know she likes Monet. To top it off, her house is decorated with many pictures of nature scenes. I've never bought a quilt kit before, always enjoying the journey of designing something unique, but this was a must! 


I made the top in January 2019 and knew how I was going to quilt it - just waiting for my longarm. Then, the Christmas rotation was revised in October 2019 and I would no longer be giving to Tamia. I was frustrated to say the least, but I guess the good thing was that the fact that her present would be late (I was getting my longarm in January 2020) would no longer be a problem.  I debated what to do, but to wait until the next time I had her name would would be another 10 or more years. I ended up giving it to her in the summer. 


The kit is entitled "Water Lily Park" by Daphne Greig with Patchwork Studios featuring Northcott’s Artisan Spirit Water Garden fabric. I did use leftover fabric to increase the size. Then I custom quilted it following the picture in the center. In the outer part, I put swirly in the sky, circles (her favorite shape) in the greenery, and watery swirls in the blue.

Thursday, February 18, 2021

Arabian Flow Quilt for Wanda


In my family, we have a rotation in place to give to each other for Christmas. I had made a quilt top for my sister, Tamia as a Christmas (2019) present, but then some revision in the rotation needed to be made and all of a sudden, (in October), I was no longer going to be giving to her, but to Wanda.  Wanda knew I was stressed because I had already invested time and money into Tamia's quilt and said I didn't have to get her anything.  I relaxed for a few weeks, but then decided I really wanted to give to Wanda! She is so kind and thoughtful. I talked with her daughter to decide pattern and color and made the quilt top before Christmas. 

Since she wasn't expecting anything that year, I figured I'd surprise her at the Family Reunion in the summer (2020) with her Christmas present. That would give me enough time after getting the longarm (in January) to learn to get good enough to quilt this. I thought a lot about how I was going to quilt it and had what I thought was a really good plan, but when I started it, I didn't like it. I think if the shapes were smaller, my plan would have been great, but with the large shapes, the quilting looked awkward. I unpicked what I had done, and went back to the drawing board. Then it hit me.


Many long years ago, I saw a beautiful jacquard fabric on some chairs. Every time I would go to that building, I would stare at the fabric and try to commit it to memory - it would make a lovely pantograph once I had a longarm. Then around Christmas 2016, a friend who worked at that building told me they had gotten new chairs that were so pretty. I was aghast. What had happened to those other chairs? They were long gone. I told her how much I loved the fabric. She did some investigating and a swatch was found which she handed to me on my birthday 2017. As I contemplated what to do on Wanda's quilt, it hit me that this was the answer. I spent the next week making this pattern.


I quilted it with a rainbow thread (Lolli by So Fine) on the front and a gray Bottom Line on the back. I love it! I got it all quilted just before the reunion (which was pretty low-key and few were there), but thanks to Covid, she didn't come.  I still have it ready to give to her, hopefully this summer. Yes, I thought about mailing it, but I'd like to be there to see it opened. So there's the story. She still doesn't know about it, unless of course she reads my blog, then the cat's out of the bag.  ;-)

Wednesday, February 17, 2021

Twin Baby Quilts


Twins. The same only different. These quilts I worked on simultaneously. Both have the same fabrics in the same pattern, but not in the same place.
 

Both use the same fabric for the backing. But the binding is different.


Both have similar free-motion quilting in every other strip with echoed lines in the alternating strip. But each free-motion strip is unique - in both quilts, giving me plenty of opportunity to practice.


I plan to donate these to the same women's shelter that I am giving my other charity quilts.


Thursday, February 11, 2021

Katie's Quilt


Another quilt commissioned by my sister-in-law, Jenny. This one for my niece. For Katie, Jenny knew exactly what she wanted. She had found a pattern on-line from Annie's Catalog called "Have a Heart." This "scrappy" heart incorporates a wide variety of colors, patterns, and styles to reflect the creative nature of the girl. 


As I put this together, I knew what pantograph pattern it needed. Andi's Ribbon Heart from Urban Elementz added just the right poof of hearts and texture to the quilt.

 The final touch was the scrappy border, bringing back the fabrics from the center to the edge. I was amazed how much I liked this since I tend to gravitate towards geometric and symmetric designs.

Sunday, February 7, 2021

Zach's Quilt

I'm forever grateful to my SIL Jenny for commissioning, not just one, but 3 quilts to get me on my way. This was commissioned for my nephew, a young man who would not appreciate anything remotely "girly." As Jenny and I talked about what he might like, a quilt I saw on the cover of the 2016 Quiltcon Magazine popped into my head. It is a pattern by Yvonne Fuchs and though I had to make some alterations in the pattern to make it the size I needed and to use the fabric I had on hand (this was during the first part of the Covid pandemic and it had become difficult to find specific fabrics). 


Straight line quilting with MonoPoly thread allows for the texture to show without the thread.


Thursday, February 4, 2021

Quilt for Rachael and Al

There are a few people that made getting a longarm a reality. I can't think of any better way to say thank you than a quilt. Rachael is one of them. She is a dear friend who entrusted her youngest two boys to me while she worked. I love those crazy boys. Being frequently in her home made me privy to her likes in decorating. 


For some reason, it seems that when I take a picture of a blue and white quilt outside in the shade, the bright white tones down to a cool blue. This is bright white and 4 blue fabrics.


Custom quilting. There are 15 different flowery patterns in the large octagons and 15 different patterns in the smaller squares. The border is a "piano keys" but with double lines between the keys. You can also see the added element of the daisy-esque hexagon and pentagons. For my 21st quilt, I'm pretty proud of this quilt.


Saturday, January 30, 2021

Eagle Quilt Tutorial


 As per requested, here is how I made the Eagle Quilts. First, I found pictures on-line of the badge, enlarged it so the center circle was 8" in diameter and printed it on regular printer paper. I wrote notes on the front of that sheet about colors I needed for that patch.


Then, using a light table, I traced the picture on the back so that I would have a reverse image. Yes, I know one can print it in reverse, but I chose to do it this way because when I made the patch, I wanted to use the "original" to help me place the pieces in exactly the right place. As you can see (above) on the back I also labeled what color each area would need to be.


For some, I couldn't find the patch on-line. I guess I could have used a table scanner and got a copy that way, but for this patch, I found it more accurate to use a picture taken at the camp. Since this is one of the big patches, it needed two pieces of paper to make it the size I wanted. The Eagle badge took 4.


For the writing I copied the words on a paper, cut to the same size - so I could match it to the exact place later - and copied the words, first to the reverse and then to the other side. I found it easier to trace the hand drawn side because it was easier to see the contrast through the paper. After tracing the lines from that side in pencil I did it again in Sharpie so I could see it through the fabric when I traced it on to sew. I believe I also had to trace it on the other side - so the letters were not backwards, too. The words were traced on the fabric lightly in pencil or a Marks-be-gone type marker.


Lots of tracing in this project. All the shapes from the papers were traced onto the iron-on double adhesive, like Wonder-Under or Heat-n-Bond Lite. These have to be the reverse of what you want them to be later.


Not knowing any better, I used the entire piece. If I could go back and do it all again, I would only have the Heat-n-Bond along the outer edges of the pieces rather than the whole thing. All those layers of webbing made the patches rather stiff in the end.  It also adds lots of layers of unnecessary fabric. I would have cut away the under layers of unnecessary fabric to cut down on bulk. But, Oh, well. I'm not re-doing it. Hot Fix has also now been suggested to me to not have the bulk. We live and learn.


I bought a large selection of Kona Cotton fabrics and matched the colors as best I could.  They are not perfect, but without putting things side by side, most wouldn't know. Even my friend who has worked for BSA for 10 years said they looked exact.


Then it's time to place each piece on the correct color and iron them down. I suggest labeling which piece goes with which patch. Even if you think it's obvious, I think it saves a little bit of headache in the end to know which goes where.


Next come the layout. Again, I would recommend only having the webbing on about 1/4" on the raw edges instead of the whole cloth. I drew circles for the outside edges. I think it was about a 10" circle. I found a plate or Tupperware lid that was the right size for both circles. That made drawing the circles easy and kept all of them the same size.


The centers were then ironed onto the center of the gray or green background (which will mimmic the edging on the patch).


Then the pieces are placed on the background fabric.


Here's where I needed the printed copy to be correct and not reversed. Sometimes I would even need to place the paper over the layout to make sure they were in the right place.


When it was right, I carefully pressed. DON'T slide that iron around. You don't want a piece to shift!


You end up with the circles laid out something like this on the gray,


And this on the green. (Yes, there are duplicates. I had two quilts to make.)


Next comes cutting them all apart so you can stitch around them. You'll need to draw the markings on each place you will stitch using your paper to guide you. As you can see, the stitching on the actual patch, when blown up this big, is pretty irregular. You have to smooth that out.


Then you stitch around it with a nice smooth zigzag. You will have to play with your settings to find what you like. I had a few sizes of stitch I used. There was the wider one for most edges and a narrow for detail work. 


I did find that running a basting stitch around the edge helped it not pucker so much when there was not the webbing under the outside square. I also ran the zigzag right along the edge, covering the raw edge. 


When doing details, I would often used a narrower zigzag. And yes, you can see I made a mistake on my line and had to erase. I did the inside details first so the outline of the shape would be done last and cover up the starts and stops.


Et, voilà. It's OK that the outside edge is not perfectly shaped at this point. In fact, since I put it away for a while, and Kona Cotton seems to fray more than other fabrics, I wish I had left a little more on the edge. Then I could trim it right before sewing it down and have fewer frays to deal with.


For most writing, I had to freehand it on the patch since the layers were too thick to use a light table. Maybe if I had written it as I did the NYLT patch I talked about above (which was done long after these patches were done), with writing it on paper with a sharpie and copying it on the fabric when it was only one layer thick, it might have been easier.


With the fingerprint, I contemplated looking at my sons' fingerprints and doing the type of fingerprint they actually have, but in the end I just did my best to do what the actual patch has.  This one was crazy hard because by the time it was blown up this big, the lines were all jumbled.  I actually had an easier time using the actual patch on my son's sash to imitate it. 


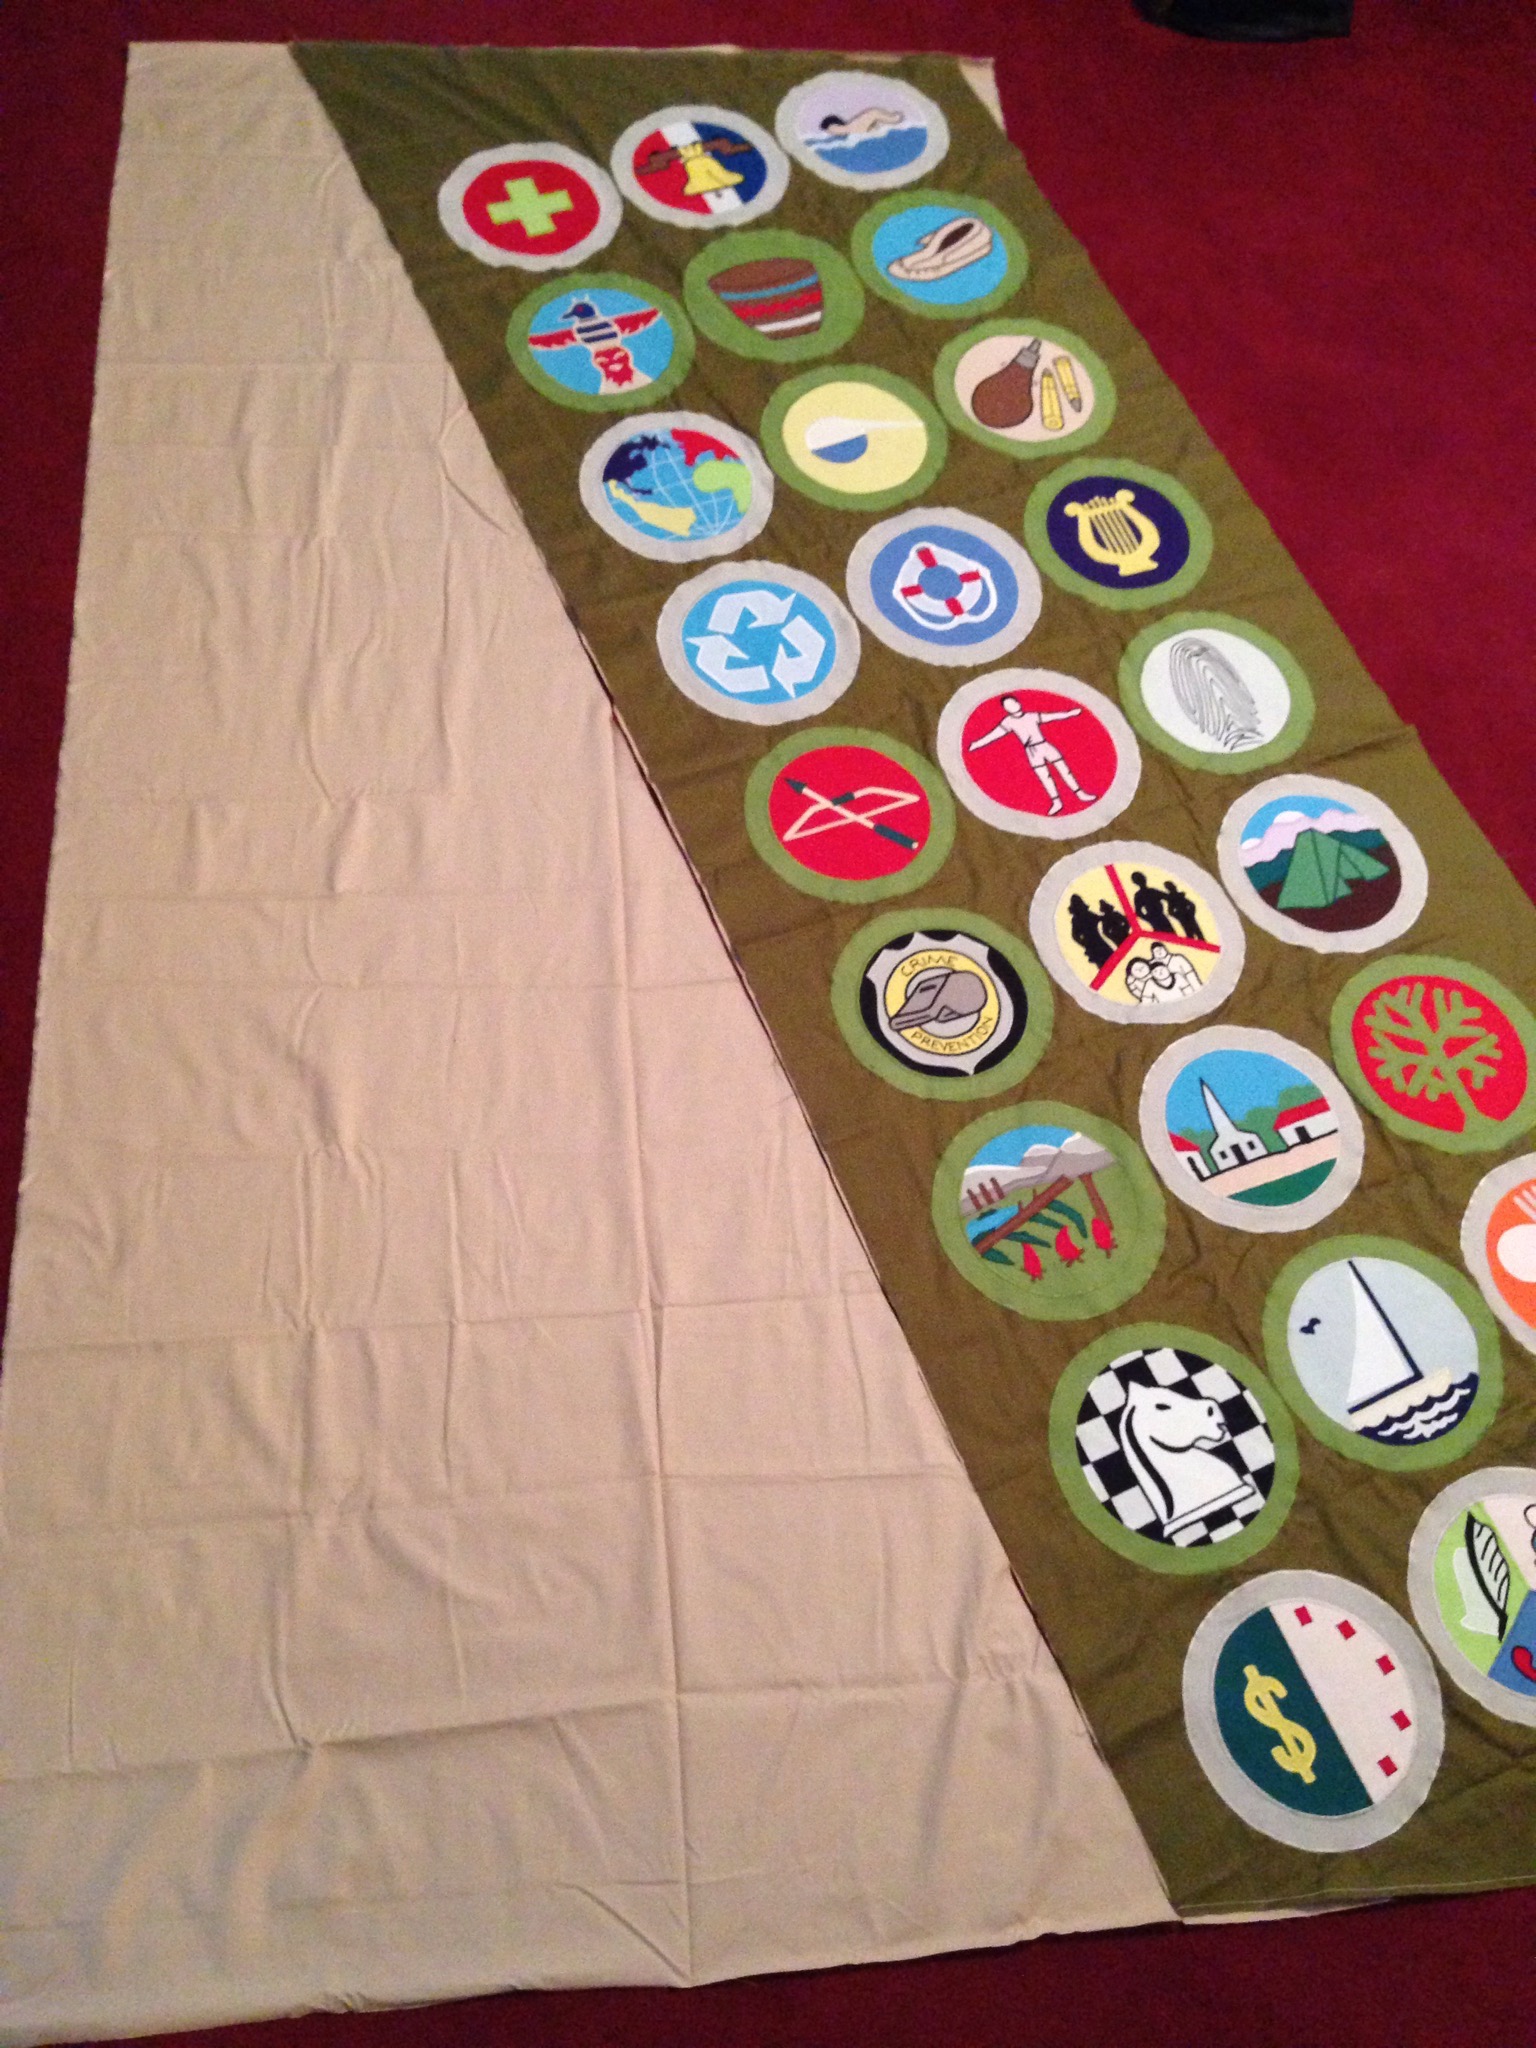
For laying out the patches on the dark olive fabric, I used my son's sashes so it would really mimmic their personal scout journeys. We did our best to make sure the patches were in the actual order they earned them.


After laying out the patches on the green and ironing them down (this time I used much less Heat-n-Bond), I laid the tan fabric out with the olive next to it and cut the tan at the correct diagonal to fit, having the same amount of tan visible at the top as I had hidden under the olive. Lots of crawling around on the floor needed for this exercise.


I appliquéd all the patches to the green (probably the most annoying part since you have to turn the entire olive length through the arm of your sewing machine a million times as you turn each patch around in a circle), and all the patches on each tan side before sewing the 3 main pieces together.


For the quilting on the first one, I used Warm and White batting so I could quilt up to 10" apart. With all the webbing in the patches, I didn't want to try and quilt too much in those areas. So, I sewed around the outside of each patch and around the inner circle. (You can see the shadow patches I added to the top and bottom of the olive green area). Each patch on the tan is stitched around the outside of the patch, and with all of those larger than the circle patches had some stitching in the ditch around the central image. Large crosshatching fills the rest of the tan. There is also stitching in the ditch between the green and tan.

The quilting for the other quilt is very similar, with a diamond crosshatch in the tan instead of squares on point crosshatching.