This tutorial has been a long time coming. Since this was my daughter's
project, I couldn't very well do it for her - takes all the fun out of
the gift. However, in putting this together, I learned a few things -
things I might do differently in the future. If you'd like to see the first part of this and how to make the blocks, go here.
The first thing I might change was when I made the kit, I cut the ties 1" wide. This made the holes between the ties larger than I would wish. You can experiment with what works best for you, but I might go with 3/4" next time. The kits I've seen in the store have 1/2" ties. Although this is going to leave a much smaller hole, there are also going to be twice as many things to tie and the stretchiness of the fabric in one direction makes the 1/2" tie seem too flimsy for my tastes. You, of course, can do as you wish.
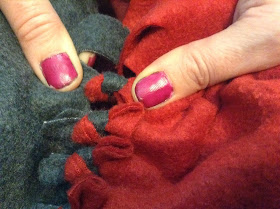
 The object is to tie each of the squares together, using square knots. One way to do this is by tying 6 squares together in a row. Then tie the next row of squares. Then tying the rows together. That is the way the tutorial on line for the kits said to do it. We opted for a different method. Fiona had mapped out exactly where each square was going to go, so we chose to add one square at a time. You see her tying the pink square onto the black. Next she will tie the pink to the navy. Choose whichever way works for you. Take care that you line up the ties correctly - they are no fun to untie.
 One thing I realized partway into the process of tying that I wish I had thought about at the beginning was that on the lengthwise grain of the fabric, there's almost no stretch, whereas on the width wise grain, there is a stretch. (see photo on right). When you put squares together, make sure you have one stretchy and one not. You see, having two stretchy is super easy to tie together. One stretchy and one not is fine, but having two that are not stretchy is really hard to tie with the ties only 2". You could also make the ties longer so you wouldn't have to worry about this, but I like the look of the little ties.
 Next is to tie a square knot. Everyone knows the "right over left, left over right" saying, but I noticed that even as my daughter thought she was doing it, she was tying granny knots (that I would then have to untie). So, here's what I do to insure that I'm doing it correctly.
When you tie your first basic overhand, you will notice that one of the ties is directed towards you, one is back away from you (see picture on left). When you go to cross those again to do the second part of the knot, the one in the back is going to be the back part of the "X" where the one in front is going to be the front part of the "X".
This can also be thought of as always looping from front to back the same string or color. With one tie being stretchy, I would opt for the stretch one to do that job.

My eldest daughter loves tying knots and is very good at it. She said for her what works best is to look at the way the knot is supposed to look when finished and she's able to tell which way the strings are supposed to go. If that works for you, than great! Here's a picture of a finished square knot. Know that the ties are supposed to be straight - the yellow will be on top of the yellow and the blue on the blue when finished. If it's going perpendicular to this, you've made a granny knot.
Repeat. Again and again and again.


As you can see, you want a little bit of space between the ties so the blanket lies flat. After tying the knot, I pull it tight by holding the tie and blanket on either side of the knot and pulling, thus helping the knots not pucker as in the next picture. If this begins to happen, pull a little more on the blocks. When the two blocks are tied together, I will also take the corners of the blocks with all the ties I just tied in between and pull gently to help it lie flat.
And here is Fiona's finished tied blanket. Pretend you don't see that horribly stained and ugly, but oh so comfortable couch that's down in the basement. You could also tie each of the outside fringed edges into knots, but I don't think she's going to do that right now. She's glad to have it done. Too bad it's June and she doesn't need it right now. . . .

The first thing I might change was when I made the kit, I cut the ties 1" wide. This made the holes between the ties larger than I would wish. You can experiment with what works best for you, but I might go with 3/4" next time. The kits I've seen in the store have 1/2" ties. Although this is going to leave a much smaller hole, there are also going to be twice as many things to tie and the stretchiness of the fabric in one direction makes the 1/2" tie seem too flimsy for my tastes. You, of course, can do as you wish.
The object is to tie each of the squares together, using square knots. One way to do this is by tying 6 squares together in a row. Then tie the next row of squares. Then tying the rows together. That is the way the tutorial on line for the kits said to do it. We opted for a different method. Fiona had mapped out exactly where each square was going to go, so we chose to add one square at a time. You see her tying the pink square onto the black. Next she will tie the pink to the navy. Choose whichever way works for you. Take care that you line up the ties correctly - they are no fun to untie. One thing I realized partway into the process of tying that I wish I had thought about at the beginning was that on the lengthwise grain of the fabric, there's almost no stretch, whereas on the width wise grain, there is a stretch. (see photo on right). When you put squares together, make sure you have one stretchy and one not. You see, having two stretchy is super easy to tie together. One stretchy and one not is fine, but having two that are not stretchy is really hard to tie with the ties only 2". You could also make the ties longer so you wouldn't have to worry about this, but I like the look of the little ties.Next is to tie a square knot. Everyone knows the "right over left, left over right" saying, but I noticed that even as my daughter thought she was doing it, she was tying granny knots (that I would then have to untie). So, here's what I do to insure that I'm doing it correctly.
When you tie your first basic overhand, you will notice that one of the ties is directed towards you, one is back away from you (see picture on left). When you go to cross those again to do the second part of the knot, the one in the back is going to be the back part of the "X" where the one in front is going to be the front part of the "X".
This can also be thought of as always looping from front to back the same string or color. With one tie being stretchy, I would opt for the stretch one to do that job.
My eldest daughter loves tying knots and is very good at it. She said for her what works best is to look at the way the knot is supposed to look when finished and she's able to tell which way the strings are supposed to go. If that works for you, than great! Here's a picture of a finished square knot. Know that the ties are supposed to be straight - the yellow will be on top of the yellow and the blue on the blue when finished. If it's going perpendicular to this, you've made a granny knot.
Repeat. Again and again and again.

As you can see, you want a little bit of space between the ties so the blanket lies flat. After tying the knot, I pull it tight by holding the tie and blanket on either side of the knot and pulling, thus helping the knots not pucker as in the next picture. If this begins to happen, pull a little more on the blocks. When the two blocks are tied together, I will also take the corners of the blocks with all the ties I just tied in between and pull gently to help it lie flat.

And here is Fiona's finished tied blanket. Pretend you don't see that horribly stained and ugly, but oh so comfortable couch that's down in the basement. You could also tie each of the outside fringed edges into knots, but I don't think she's going to do that right now. She's glad to have it done. Too bad it's June and she doesn't need it right now. . . .

No comments:
Post a Comment