Pricing

Long Arm Quilting/ Sewing or Quilting Lessons / Custom Made Items
I am a long arm quilter with rates starting at $.02/square inch. Most edge to edge designs are $.025/square inch. My prices include set up, thread, needles, etc. I make commissioned quilts with rates at $25/hour.
I also teach Private Sewing Lessons in the St. Louis area. Cost is $50/hour.
Please e-mail me with any questions, to have your quilt top quilted, to set up sewing lessons, or regarding having something custom made, at showmesewing@gmail.com.


Thursday, January 30, 2014

Quick Quilt for the Nursery


OK, I'm not showing you this quilt to account for some amazing technique or talent.  Maybe it's only to account for my time. :-)  We have quite a number of young children in the nursery at church.  So many that we have divided them into several different nurseries.  One of the nurseries needed a quilt to sit on for snack time / lesson time.  I looked through the fabric that had been given my by a friend when she was cleaning out her mom's house (after taking her to a home that could watch her better with the dementia she was suffering).  Lo and behold there was some printed fabric to look like a quilt that had a matching back.  What I used for the top had been cut - there was a big square with a hole cut in the center (maybe a tree skirt) and a cut from the middle of one side up to the hole.  There was a rectangular piece left over of the printed fabric.  There was also a plain green bagged with the fabrics that was close, but not an exact match of the green on the printed fabric.  Looked like a perfect way to quickly throw a quilt together.

I used left over batting and pieced it together. Then tried out a couple machine quilting stitches the plain green areas.   The rest of the quilt just got a "stitch-in-the-ditch" type quilting, nothing too complicated.  Finished it all in 2 days (piecing the batting took a lot of time).  But presto, a quilt that cost me nothing (but a little time).  And the children can eat snacks and contain the mess.

Tuesday, January 28, 2014

January Quilt

Where has the time gone?  I'm sure most of you feel the overwhelming load of work from time to time.  I'm no exception.  Since our furnace just went out overnight with the outside temperature in the single digits, now would be a good time to show you my January wall quilt, made 15 years ago to grace my wall each January. (Don't worry, we have a fireplace insert and it's keeping us pretty warm in the front room). 


My sister Tamia did most of the designing for this.  This was the first of the wall hangings I finished quilting and I used regular variegated thread.  Pretty thread, but didn't withstand the vigor of hand quilting.  The thread kept breaking.  Then when all was done, you couldn't even see the colors in the thread, nor the snowflakes I quilted into the big blue areas.  So not worth it. . . .  I learned that hand quilting thread is special for a reason - and worth it.


Tuesday, January 14, 2014

New Lunchboxes for the Girls

Well, it took me 3 extra months to get the girl's lunchboxes done, but I finally did and gave them as gifts at Christmas.  They were done in leftover fabric from the Toujours Bleu et Blanc fabric as well as the matching Blue and White Porcelain fabrics from Michael Miller's new Blue and White Collection.  They are fully lined and washable as well as insulated with Insul-Bright.  They have an inside pocket and elastic for holding a bottle upright. Two pockets on the outside as well.


Here you get a quick view of the interior.  I plan on putting up a tutorial at some point.


Thursday, January 9, 2014

Silky or Magic PJs for the kids

My sister, Emerald made pj's for my kids.  The girls got matching silky pajamas and the boys got matching Magic The Gathering pajamas.


Here we have the girls, Fiona and Karina had been begging for silky pajamas after Emerald made some for Fiona when she was 3.  She grew out of them and Karina inherited them and wore them until she couldn't put them on anymore.  The fabric is so hard to work with and the seams can't take a lot of pressure.  So Karina rolling around on the floor and doing cartwheels in them have ripped out seams twice in her armpit area.  We may need to put a gusset in.


Donovan and Sterling really enjoy the card game "Magic the Gathering" and have instilled that Magic cards are "cool" in their younger brothers.  Donovan has made decks for them and Gideon will play with him (rather randomly as far as which cards to play when, but enthusiastically, none the less).  For Christmas, Gideon had put on his wish list "more Magic cards than Donovan."  Emerald made them each pajama pants then scanned in their favorite magic cards and printed them on the special fabric paper that you can print from your computer.  She then appliqued them down the sides of both pant legs.  The little boys also got their favorite card (based solely on the picture, not what it does) on the shirt.  They LOVE them.  As soon as they are washed, that's the pj of choice.  Porter wore them the last two nights in a row since they had been washed in between.

Saturday, January 4, 2014

Fiona's Panda Skirt

Sorry it's been so long since I posted - I've been playing hookie from work, at least the work that I normally do when kids are at school, and have been focusing on having fun with them on their Christmas Break.  Here is the Panda Skirt I made for Fiona - my panda girl - for Christmas.  I discovered that appliqueing on silky, slippery fabric is not the easiest thing to do.  The panda cinched in that red triangle of fabric and the thickness makes it not hang as well, but she doesn't mind.  Fun idea and really a very simple skirt to make.  If I were to do it again I would either put the panda on one of the straight panels (the black here) or change the way I put the applique on so it wouldn't be so think in the end.


                                         And a close up . . . .


Tuesday, December 17, 2013

Tied Fleece Blanket Kit Tutorial

Here's a fairly simple idea for a Christmas present.  This is what Gideon's giving to Fiona.  I'm sure you've seen the tied fleece blanket kits where you buy the pre-cut squares of fleece with the edges cut into fringe that you tie together to make a blanket.  You can make it yourself.  (Click here to go to the tutorial on how to finish the blanket as well as things I learned in the process of helping Fiona put it together).


I bought a special June Taylor ruler that has long slits in the plastic for the rotary cutter to make even cuts with.  This of course could be done without the fancy ruler, but I figured the price of the ruler was about the price of the kit and I would be able to make however many I wanted and whatever size I wanted.  I'm glad I bought it since I'm a perfectionist and wanted the fringe to be exactly the same width and size.  Let me show you how I did this.


First start with fleece - I used scraps left over from other projects so there was no extra monetary cost to this gift.  Each square I cut into a 12" square.  With 2" fringe on all sides, the final area will be an 8" square.  You can make it whatever size you want, but you do want to allow enough fringe to be tied.  Most instructions I found for tied fleece blankets were for the kind with fringe only around the outer edge.  Each instructed you to have 3-4" per side for the fringe.  But when I did the math for the boxed set at the store, they allowed only 1.75" per side for the fringe.  I figured that having really long fringe all over the blanket might be excessive, but you can do it however you want - just figure that into your cutting size.  The 12" size fit under the ruler perfectly - a bonus I had not planned on but was glad for.
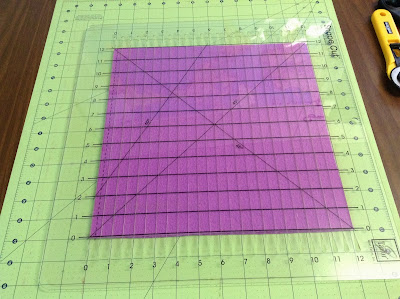

 Next I centered the ruler over the square.  Because I  was cutting 2" fringe, I began cutting the fringe 2" from either edge and cut close to, but not over the 2" line.  It's much easier to even the cuts with scissors that to end exactly where you want with a rotary cutter.  I cut the fringe 1" wide - mostly because it was easiest and I'm lazy at heart. You could do it less than that, but I wouldn't go bigger or it would give more puckers in the fabric between each knot.  The kit they sell pre-made has 1/2" cuts which has its advantages and disadvantages.  If you want my pros and cons list, just ask.


After the initial cutting on all 4 sides with the rotary cutter, slide the ruler up to the bottom cuts on both sides, lining up the edge of the ruler exactly.  With a sharp pair of scissors, cut each of the fringe up to the edge of the ruler.  I cut the bottom, then slid the ruler down, turned the cutting mat around and cut the top.  Then did the left and right, always turning the mat around so my cutting would be at the bottom, nearest to me.  If you can help it, don't move the fabric once you lay it out, it's so much harder to square it up again. 


 When you cut the two sides, the corners will be cut off.  That is as it should be.  Now repeat for all the squares.  I tried doing two at a time and it worked, but my hand was really sore from the rotary cutting by the end of the day.  As my dad used to say, "Lazy people work the hardest."  I'm living proof of that.
 

To put together, simply place 2 pieces next to each other and tie the fringes together using square knots (right over left, left over right).  You do want to tie them securely, but if you pull the first part of the knot too tight, it's going to pucker and not lie flat.  Keep tying them together until you have a nice sized throw blanket.  48 squares (6x8) will give you a blanket that is 48"x 64."  Maybe after Christmas when Fiona begins to make it, I can take some pictures and put a little tutorial up about putting it together.  Right now it's wrapped and under the tree.

Saturday, December 14, 2013

Mom's PJ pants with hand prints

Total surprise from my sister and kids last Christmas.  Emerald made me flannel pajama pants and had the kids put their hand prints, name and age on it with the year on the bottom.  Isn't it fabulous?  What an easy and memorable Christmas present to give.  You could make the pj pants or put hand prints on store bought ones - personalizing it with love.


Wednesday, December 11, 2013

Christmas Tree Skirt

I love this family tradition of ours.  We put the children's hand prints on the Christmas tree skirt with paint, label and date them and over the years watch them grow.  I have tons of pictures to do a tutorial on this one, but for now, with all the home made presents I have to work on, that will have to wait until later.  If you are anxious to do this and want some help or to see close up photos, feel free to comment or e-mail me and I will either put the tutorial up right away or write you directions, whichever works best.

Saturday, December 7, 2013

Velvet Christmas Stockings


My mother made velvet stockings for all of our family (12 siblings, well, 11 had stockings since my youngest brother died before he would have had a Christmas) to match the stockings her mother had made for her family.  My mother had a maiden aunt that lived with their family and worked as a dress maker.  She would bring home scraps of material, including velvet.  From the scraps brought home by Great Aunt Elise, stockings were made for their family.  Mother made stockings for us when I was a baby, so mine was the first one made (all the 7 older siblings had some type of stocking already).  My mother told me that the fabric for my stocking (the black one) was leftover from the fabric grandma used to make her (my mother's) stocking.  The scraps for the decoration was from Great Aunt Elise.  When I asked Mother from the pattern so I could continue the tradition, she sent me the patterns and a baggie of scraps which I used in addition to my own scraps to make stockings for my husband and children.  My husband was skeptical of multiple colors of stockings, but he conceded as long as he had a red one - he'd always had a red stocking.  So, I made his with everything in as traditional a color as I could - white lining, green tree, black engine.


Going from left to right, the stockings go up by age plus my husband's, mine and my sister, Emerald's. They are lined with a contrasting color of satin type fabric (costume satin, probably) - the same color as their name which is embroidered as the train's steam.  Decorations are done with beads, sequins, fabric, and ribbons.  Rickrack or some kind of trim goes around the top opening.  Jingle bells are sewn to dangle with a crocheted chain stitch of embroidery floss.  Christmas trees, animals, bells and trains are all hand appliqued.  All time consuming, but worth it.


Tuesday, December 3, 2013

December Quilt

The December wall hanging quilt has a scappy look for the wreath and metallic fabric for the candle flame and candle holder.  Unfortunately the gold fabric has lost its luster after 15 years - I wonder why. ;-)  It was quilted "stitch in the ditch" and in the big open spaces there are holly leaves quilted, all done rather simply, by hand.  The back matches the border and binding.


 Close ups of the stitching.