Pricing

Long Arm Quilting/ Sewing or Quilting Lessons / Custom Made Items
I am a long arm quilter with rates starting at $.018/square inch. Most edge to edge designs are $.021/square inch. My prices include set up, thread, needles, etc. I make commissioned quilts with rates at $20/hour.
I also teach Private Sewing Lessons in the St. Louis area. Cost is $50/hour.
Please e-mail me with any questions, to have your quilt top quilted, to set up sewing lessons, or regarding having something custom made, at showmesewing@gmail.com.


Tuesday, December 17, 2013

Tied Fleece Blanket Kit Tutorial

Here's a fairly simple idea for a Christmas present.  This is what Gideon's giving to Fiona.  I'm sure you've seen the tied fleece blanket kits where you buy the pre-cut squares of fleece with the edges cut into fringe that you tie together to make a blanket.  You can make it yourself.  (Click here to go to the tutorial on how to finish the blanket as well as things I learned in the process of helping Fiona put it together).


I bought a special June Taylor ruler that has long slits in the plastic for the rotary cutter to make even cuts with.  This of course could be done without the fancy ruler, but I figured the price of the ruler was about the price of the kit and I would be able to make however many I wanted and whatever size I wanted.  I'm glad I bought it since I'm a perfectionist and wanted the fringe to be exactly the same width and size.  Let me show you how I did this.


First start with fleece - I used scraps left over from other projects so there was no extra monetary cost to this gift.  Each square I cut into a 12" square.  With 2" fringe on all sides, the final area will be an 8" square.  You can make it whatever size you want, but you do want to allow enough fringe to be tied.  Most instructions I found for tied fleece blankets were for the kind with fringe only around the outer edge.  Each instructed you to have 3-4" per side for the fringe.  But when I did the math for the boxed set at the store, they allowed only 1.75" per side for the fringe.  I figured that having really long fringe all over the blanket might be excessive, but you can do it however you want - just figure that into your cutting size.  The 12" size fit under the ruler perfectly - a bonus I had not planned on but was glad for.


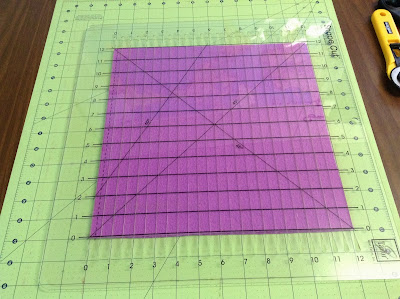
 Next I centered the ruler over the square.  Because I  was cutting 2" fringe, I began cutting the fringe 2" from either edge and cut close to, but not over the 2" line.  It's much easier to even the cuts with scissors that to end exactly where you want with a rotary cutter.  I cut the fringe 1" wide - mostly because it was easiest and I'm lazy at heart. You could do it less than that, but I wouldn't go bigger or it would give more puckers in the fabric between each knot.  The kit they sell pre-made has 1/2" cuts which has its advantages and disadvantages.  If you want my pros and cons list, just ask.


After the initial cutting on all 4 sides with the rotary cutter, slide the ruler up to the bottom cuts on both sides, lining up the edge of the ruler exactly.  With a sharp pair of scissors, cut each of the fringe up to the edge of the ruler.  I cut the bottom, then slid the ruler down, turned the cutting mat around and cut the top.  Then did the left and right, always turning the mat around so my cutting would be at the bottom, nearest to me.  If you can help it, don't move the fabric once you lay it out, it's so much harder to square it up again. 


 When you cut the two sides, the corners will be cut off.  That is as it should be.  Now repeat for all the squares.  I tried doing two at a time and it worked, but my hand was really sore from the rotary cutting by the end of the day.  As my dad used to say, "Lazy people work the hardest."  I'm living proof of that.
 

To put together, simply place 2 pieces next to each other and tie the fringes together using square knots (right over left, left over right).  You do want to tie them securely, but if you pull the first part of the knot too tight, it's going to pucker and not lie flat.  Keep tying them together until you have a nice sized throw blanket.  48 squares (6x8) will give you a blanket that is 48"x 64."  Maybe after Christmas when Fiona begins to make it, I can take some pictures and put a little tutorial up about putting it together.  Right now it's wrapped and under the tree.

Saturday, December 14, 2013

Mom's PJ pants with hand prints

Total surprise from my sister and kids last Christmas.  Emerald made me flannel pajama pants and had the kids put their hand prints, name and age on it with the year on the bottom.  Isn't it fabulous?  What an easy and memorable Christmas present to give.  You could make the pj pants or put hand prints on store bought ones - personalizing it with love.


Wednesday, December 11, 2013

Christmas Tree Skirt

I love this family tradition of ours.  We put the children's hand prints on the Christmas tree skirt with paint, label and date them and over the years watch them grow.  I have tons of pictures to do a tutorial on this one, but for now, with all the home made presents I have to work on, that will have to wait until later.  If you are anxious to do this and want some help or to see close up photos, feel free to comment or e-mail me and I will either put the tutorial up right away or write you directions, whichever works best.

Saturday, December 7, 2013

Velvet Christmas Stockings


My mother made velvet stockings for all of our family (12 siblings, well, 11 had stockings since my youngest brother died before he would have had a Christmas) to match the stockings her mother had made for her family.  My mother had a maiden aunt that lived with their family and worked as a dress maker.  She would bring home scraps of material, including velvet.  From the scraps brought home by Great Aunt Elise, stockings were made for their family.  Mother made stockings for us when I was a baby, so mine was the first one made (all the 7 older siblings had some type of stocking already).  My mother told me that the fabric for my stocking (the black one) was leftover from the fabric grandma used to make her (my mother's) stocking.  The scraps for the decoration was from Great Aunt Elise.  When I asked Mother from the pattern so I could continue the tradition, she sent me the patterns and a baggie of scraps which I used in addition to my own scraps to make stockings for my husband and children.  My husband was skeptical of multiple colors of stockings, but he conceded as long as he had a red one - he'd always had a red stocking.  So, I made his with everything in as traditional a color as I could - white lining, green tree, black engine.


Going from left to right, the stockings go up by age plus my husband's, mine and my sister, Emerald's. They are lined with a contrasting color of satin type fabric (costume satin, probably) - the same color as their name which is embroidered as the train's steam.  Decorations are done with beads, sequins, fabric, and ribbons.  Rickrack or some kind of trim goes around the top opening.  Jingle bells are sewn to dangle with a crocheted chain stitch of embroidery floss.  Christmas trees, animals, bells and trains are all hand appliqued.  All time consuming, but worth it.


Tuesday, December 3, 2013

December Quilt

The December wall hanging quilt has a scappy look for the wreath and metallic fabric for the candle flame and candle holder.  Unfortunately the gold fabric has lost its luster after 15 years - I wonder why. ;-)  It was quilted "stitch in the ditch" and in the big open spaces there are holly leaves quilted, all done rather simply, by hand.  The back matches the border and binding.


 Close ups of the stitching.


Monday, December 2, 2013

November Quilt

I'm late putting this up, but my excuse is Thanksgiving and kids needing the computer for homework, etc.  Here's my November wall hanging quilt.   The colors seem a bit off.  The pattern is a variation of a Drunkard's Path.


Tried to give you a close up, but there was just something off with the lighting that I couldn't fix.  Ugh.  Hopefully you get the idea.

Sunday, December 1, 2013

Gingerbread Houses 2013

OK. I know this is not sewing, but I had to show you how creative my family is.  Last year we had so much fun making graham cracker "gingerbread" houses at my sister-in-law's house, that we had to do it again this year.  I'm amazed at what they can do with the candy we happened to have lying around. (I know, the amount of candy that we happened to have lying around is obscene, but Halloween was a month ago . . .)

This is my husband's.  He spent the whole time helping the two little boys with their houses, so he didn't have any time left.  He grabbed the last two halves of graham crackers and made a tent, sleeping bag and camp fire.  Love it!


 Here's my simple house.  By the time I finished getting everything ready for making the houses and then having 3 kids demanding that I help them put their houses together at the exact same time, I was pretty frazzled.  I went to the other side of the table and let my husband help them decorate, and fix Porter's house that kept falling apart.

 Last year I discovered that I really just liked the icing on the graham crackers so I pretty much only did icing to decorate. . . and a few m&ms and candy corns.  I wanted to make a Santa Claus coming out of the chimney, but couldn't figure out how.

Porter's house (age 3).  His dad fixed the problem of the falling roof by making the roof flat.  When I came over to see the house he'd made, it was pretty much only decorated on top, so I showed him how to decorate around the bottom and make a pathway.

Gideon (age 5) called this his camp site. I don't know if you can tell very well, but that splotch of purple skittles is in the shape of a "G."


Karina, at nearly 8 years old, is trying to incorporate those things that she sees in her older sibling's houses.  A fine mixture between chaos and order . . . and lots of candy.


 With Fiona (age 10) you see some fabulous creativity.  A Christmas tree built out of m&ms and red hots, the candy cane stick made from flavored tootsie rolls and the fabulous Santa in his sleigh made with tootsie rolls and a carmel apple flavored candy corn.


Sterling (age 13) spent so much time getting the worms put through roof and wall of the house that by the time he was done with that, "all the good candy was gone."  I'm not sure what he was hoping for, maybe the candy bars Fiona put on her roof.  I like the angle of the roof.


Donovan (age 15) went for a Frank Lloyd Write house.  It's funny because when all were asked if they wanted to build gingerbread houses, he said he didn't, but when everyone else was doing it, he sat down and began to built very randomly.  As he got into it, he took more and more care in it.


Monica (age 18) does some amazing things. She built a tiny house and built the roof with stacked m&ms.  Her front sidewalk is a tootsie roll flattened with the brick drawn lined with gummy worms.  She has an abominable snowman, wood stack, fence, turkey, stream, fence, and carefully carved Santa Claus.


Last year, my sister, Emerald built a train station.  This year she built a church.  I love it.

Thursday, November 21, 2013

Tutorial on Hand Quilting

I want to share with you what I do in hand quilting, particularly the beginning and ending with hiding the knots in the quilt.  I have done the regular things that I was taught, both as a child as well as seeing it on others blogs of just popping the knot into the quilt so it's caught in the batting in the center of the quilt sandwich. At the end, they tell you to make a knot and pop the knot inside again.  I'm all for hiding the knot inside, but since I use my quilts on my bed, there is wear and movement on the quilt and I have had those knots rear their ugly heads and even come undone after they are on the outside of the quilt.  I have also tried the method of no knots, just sewing back and forth (basically back stitching by hand). Both ways I have had problem with so I now have my own variation.

These are the things I have discovered to help keep those knots stay inside as well as having enough of the thread going through the batting so I don't see those knots again, nor have them undo.  I took lots of pictures, so I hope that helps make it clear.  It certainly makes it long.  Obviously, I'm left handed. For all ye righties out there, mirror what I'm doing.  You can do it. Please pardon my fingernails - I was helping with Scouting for Food and was showing my support.

Fig.1
Fig. 2


My mother taught me that because of the twist of the thread, one should always tie the knot, then cut the thread. This will help prevent unwanted knots in the thread as you quilt. I do not know if this is still the case, but I continue to do it.  I'm all for anything that will prevent having to undo knots.

Here is how I tie a knot.  Holding the end of the thread with my thumb, between my thumb and forefinger, wrap the thread around your finger until the thread crosses the first (I'm exaggerating the X in Fig.1, you don't want it to be quite so pronounced). Where your thumb is holding, now two strings, begin rolling the thread off your finger with your thumb, the threads twist like in Fig 2.

Fig. 3
Fig. 4


As soon as it rolls all the way off your index finger and you're holding it with the tip of your index finger and thumb, catch the thread above the twist between your middle finger and thumb (Fig. 3) and slide the twist in the thread back towards the end of the thread, moving your index finger when necessary and when you're sure the knot will stay on the thread. (Fig. 4)

Fig. 5
Fig. 6


I keep a knot on the spool.  When I cut myself another thread, I then tie a knot back on the spool (there is already one on the thread I will use). (Fig 5) This makes it so I don't have to remember to tie the knot first, then cut the string as my mother instructed me.  I still do it in the order I was accustomed to.  Next I thread the needle. (Fig. 6)

Fig. 7
Fig. 8


Here's where I change the rules a bit. Rather than just poking my needle in any old place near my starting location, I try to find a seam approximately half the needle's length (or more) away from where I'm going to begin. (Fig. 7). My goal is to run the quilting thread and knot between the machine sewn threads, as well as between the layers of fabric.  Why? Because when I try and pop the knot through the fabric, far too many times, it snags the fabric, even when I very carefully put the needle between the threads of the material.  So, finding a place to gently wiggle in my needle, far enough that when I "pop" the knot in, it will disappear, I begin weaving the needle up and down inside the quilt sandwich, catching seam allowances and batting to keep the knot from moving.  I then bring the needle out on the top of the quilt in the exact location I wish to begin quilting. (Fig. 8).

Fig. 9
Fig. 10


Next I pop the knot inside the quilt by gently tugging on the thread. (Fig. 9). Sometimes, the knot doesn't want to easily pop in. When this happens, I use my needle to ease open the area I want the knot to enter. Sometimes trying to "open the door wider" and sometimes "shoving from behind" with the needle.

Fig. 11
Fig. 12


This knot was very obliging in being obstinate so that I could show you more techniques.  In Fig. 10, I'm trying to open the area more to get the knot through.  In Fig. 11, I'm poking it in.  It then left a tail hanging out, so after poking it in as much as I could from the entrance hole, (Fig. 12), I then partially inserted the needle a short distance away from where the internal thread should be and with a sweeping motion of the needle, I caught the thread with the needle and pull it all the way inside, from the inside.  Shown in Fig. 13. There are better pictures of this at the end of the post (Fig. 29-31).

Fig. 13

Next you are ready to quilt. Taking a small stitch from where you started, poke the needle through the quilt enough so that you feel the point coming through the back.  Still holding on to the needle on top of the quilt, bring the needle point to the top so you've taken a stitch on the bottom side of the quilt.  Repeat.  The stitches on top and bottom should be the same size in length.

Fig. 14
Fig. 15


If you are just beginning, you may feel more comfortable taking only one stitch like this at a time, pulling the needle and thread through the fabric before repeating.  As you become more comfortable, you will be able to rock the needle up and down to take multiple stitches before pulling the needle and thread all the way through. (Fig. 14)

Sometimes, I have a hard time grabbing onto the needle to pull it through.  In times like these, my best friend in the whole wide world is this tool - forceps. (Fig. 15)  I have some with both a curved end and straight.  Both work fabulously.  I don't know how life existed before I got some.

Fig. 16
Fig. 17


Now to tie the knot.  I begin by bringing the needle up at the end of a stitch just a tiny smidgeon beyond where I normally would and take care to bring the needle out between the threads in the fabric. Next you are going to take a stitch, only on the top layer of fabric, starting on one side of the thread and coming out on the other.  If you were sewing from left to right (as in Fig. 16), you begin on the left of the thread and come out exactly the same distance on the other side of the thread. Pull the needle until you have a little loop at the end. (See Fig. 17).

Fig. 18
Fig. 19


Put your needle through that loop, then wrap the long end of the thread around the needle. (Fig. 18)  Pull the needle through.  Pull until you have a knot.  It will look like a tiny trident. (Fig. 19)

Fig. 20
Fig. 21


Repeat, putting the needle through the same loop, wrapping the thread around the needle in the same direction as before (Fig. 20) and pulling to tighten. (Fig. 21) The knots should be together at the base of the tines of the trident.


Fig. 22
Fig 23


Here comes the fun part.  Okay, maybe not so fun.  I hope your eyes are better than mine.  Insert the point of the needle exactly through the same hole as the middle thread. (Fig. 22) It has to be exact or the knot won't "pop" in and disappear and if you were not careful to bring the needle up between the woven threads of the cloth, it will be even harder to find your hole.  I pull the threads around to try and get the best view and use my needle to try and run right along the edge of the thread coming out the hole.  Once I'm sure I'm in the right place, I run my needle as far as I can, while at the same time weaving it up and down through the batting to help secure it. (Fig. 23)

Fig. 24
Fig. 25


Pulling on the thread, (Fig. 24) I pop the knot inside the quilt sandwich. (Fig. 25).  Because of the trident, there is just enough thread to have the knot be in the fabric and  not keep the tension on the thread where it popped in.  Let's get rid of that little tent that it looks like now in the photo.
 
Fig. 26
Fig. 27


Simple solution: Using the needle, gently pull those threads back just enough that they lay straight and look more like a regular stitch from a distance. (Fig. 26).  Sometimes I will do some extra weaving thread inside the quilt (can be done at the beginning as well as the end) so there is an ample tail inside, or so I can come in at a seam rather than the middle of a block.  Again you are carefully putting the needle down through the same hole the thread is coming out of and weaving the the needle through the batting. (Fig. 27)  As you see, I switched directions.  I like to think that this makes it less likely for the thread move around.

Fig. 28
Fig. 29


Next cut the thread close to the fabric. (Fig. 28) When I did this, because I was trying to take a picture at the same time, I ended up with a little more thread sticking out than I normally do, but not to worry.  That gives me the chance of showing you again how to pull the thread into the center with the needle. (Fig. 29, 30, 31). Observe how the needle moves and the thread disappears.

Fig. 30
Fig. 31


Fig. 32


Fig. 33


If you cut the thread close to the fabric, you only need to rub the end of the thread to make it disappear inside. (Fig. 32)   Et, voila! Karina's quilt is coming along. (Fig. 33)