Pricing

Long Arm Quilting/ Sewing or Quilting Lessons / Custom Made Items
I am a long arm quilter with rates starting at $.018/square inch. Most edge to edge designs are $.021/square inch. My prices include set up, thread, needles, etc. I make commissioned quilts with rates at $20/hour.
I also teach Private Sewing Lessons in the St. Louis area. Cost is $50/hour.
Please e-mail me with any questions, to have your quilt top quilted, to set up sewing lessons, or regarding having something custom made, at showmesewing@gmail.com.


Wednesday, June 22, 2022

Emerald's Rainbow Scrappy Squares Quilt for Lisa


Another scrappy quilt made by my sister, Emerald. I quilted it with stitch in the ditch (SID) around each square with different flowers in the squares.
 

The back is pieced. You can't tell in this picture because the sun is washing it out, but it's really green. The more solid green is the same fabric as the binding in the picture below.


Here are some close ups no the flowers.


The Glide thread matched each square. Colors were: Chocolate, Valentine, Pumpkin, Lemon, Emerald, Blue Jay, Blizzard, Tabriz Orchid and Grape.


This quilt is going to a friend, Lisa, from grade school.

Monday, June 20, 2022

Marilou's St. Patrick's Green and White Quilt


Marilou made this lovely quilt top and asked me to quilt it for her. She wasn’t sure of the pattern name and my sleuthing skills have not found it, but I do find it eye catching.


I quilted a leaf pantograph (Fall Foliage enlarged 150% from Urban Elementz) in the pieced area and a free handed swirl in the border using Glide Celery thread on the top and MicroQuilter Sage on the back.


The backing fabric is not trimmed yet as she prefers to do that herself, but that allows you to see the back fabric.

Saturday, June 18, 2022

Pat's T-shirt Quilt


Pat made this large t-shirt memory quilt and allowed me to quilt it for her. I used MonoPoly smoke thread on top and Glide 60 Pacific blue on the bottom.

Thursday, June 16, 2022

Samantha's Wedding Quilt


This is a wedding quilt for a dear friend, Samantha - a group effort from her mom and grandma (two other dear friends). Grandma (Mary) made the top according to Sammy’s specs, and mom (Michelle) designed the logo - a combo of the newlyweds’ first initials. Mary then finished it later by hand stitching the binding on the back.
 

I quilted it with Sterling Gray Glide thread for the logo and White Glide thread everywhere else. Remember I don’t have a computer to achieve perfection. Just practice and rulers.


I only got a couple photos before it started pouring rain, but this last photo shows what it would look like folded in half lengthwise on the end of the bed.

Monday, June 13, 2022

Quilt Repair - Fixing the Hole Made by a Dog


A friend asked me to fix her brand new quilt that their puppy chewed a hole in. Preferably before her mom (who made it) came to visit and saw it and preferably in a way that mom wouldn't notice. 

Repairing this one took much more time in the thinking and figuring department than in the actual execution of it. Luckily she had leftover fabric from it being made.


For those interested in how one goes about repairing this kind of thing, I’ll try to explain briefly. Fill in the batting holes with new batting. I did this by placing batting under the hole and tracing around it with a water disappearing marker (Marks Be Gone or the like). I then cut around the outside of my marks and wedged them into place. I did not want holes in between the batting pieces and I wanted it to be snug. I then basted it in place and finish with fusible interfacing to help hold those pieces together. The really small rips in the batting, I simply stitched the rip closed.


Unpick entire area to replace. Measure carefully (because after washing, the fabric has shrunk a bit). Preshrink the fabric, cut carefully, piece together, press and hand stitch back into place.


Hand stitch patch for the back as well.


Measure and mark where the quilting should be. Quilt. Breathe.


Aside from the new fabric being a bit brighter right now (that’ll change as it’s used), you can only spot that it’s repairing from the back. If you like a good I-Spy game, on the picture below, there are 3 glaring (to me) things that show there was a repair. Can you find them?


First you can see the patch, which is smaller than the patch on the front. No help for that because the back was a solid piece to begin with and more pieces on the front had to be replaced or covered because a little rip into one triangle required the whole piece to be removed and replaced. Second, the thread I used was a 60 weight instead of a 40 weight, so it’s thinner. The difference is visible. Lastly, because the front patch is bigger than the back patch, there are two circles that were quilted twice.


You can see the difference, but hopefully after the quilt has been loved and used a while, the color difference will disappear. With a patch on the back, Mom may still find out that it was repaired, but from the front, she'll never know.

Thursday, June 9, 2022

Scrappy Rainbow 45-degree Triangle Refugee Quilt


Another refugee quilt, this top was made by my sister, Emerald.


Again, making the top from our leftover 2” strip scraps.


I quilted it with the Urban Elementz pantograph called “Starlet” in a light pink thread (So Fine on top and Bottom Line on the back).


The back is also pieced. It's a different way than I've seen before, but I like it.

Monday, June 6, 2022

Wavy Weave Quilt Tops Baby/Toddler and Queen/King - Tutorial


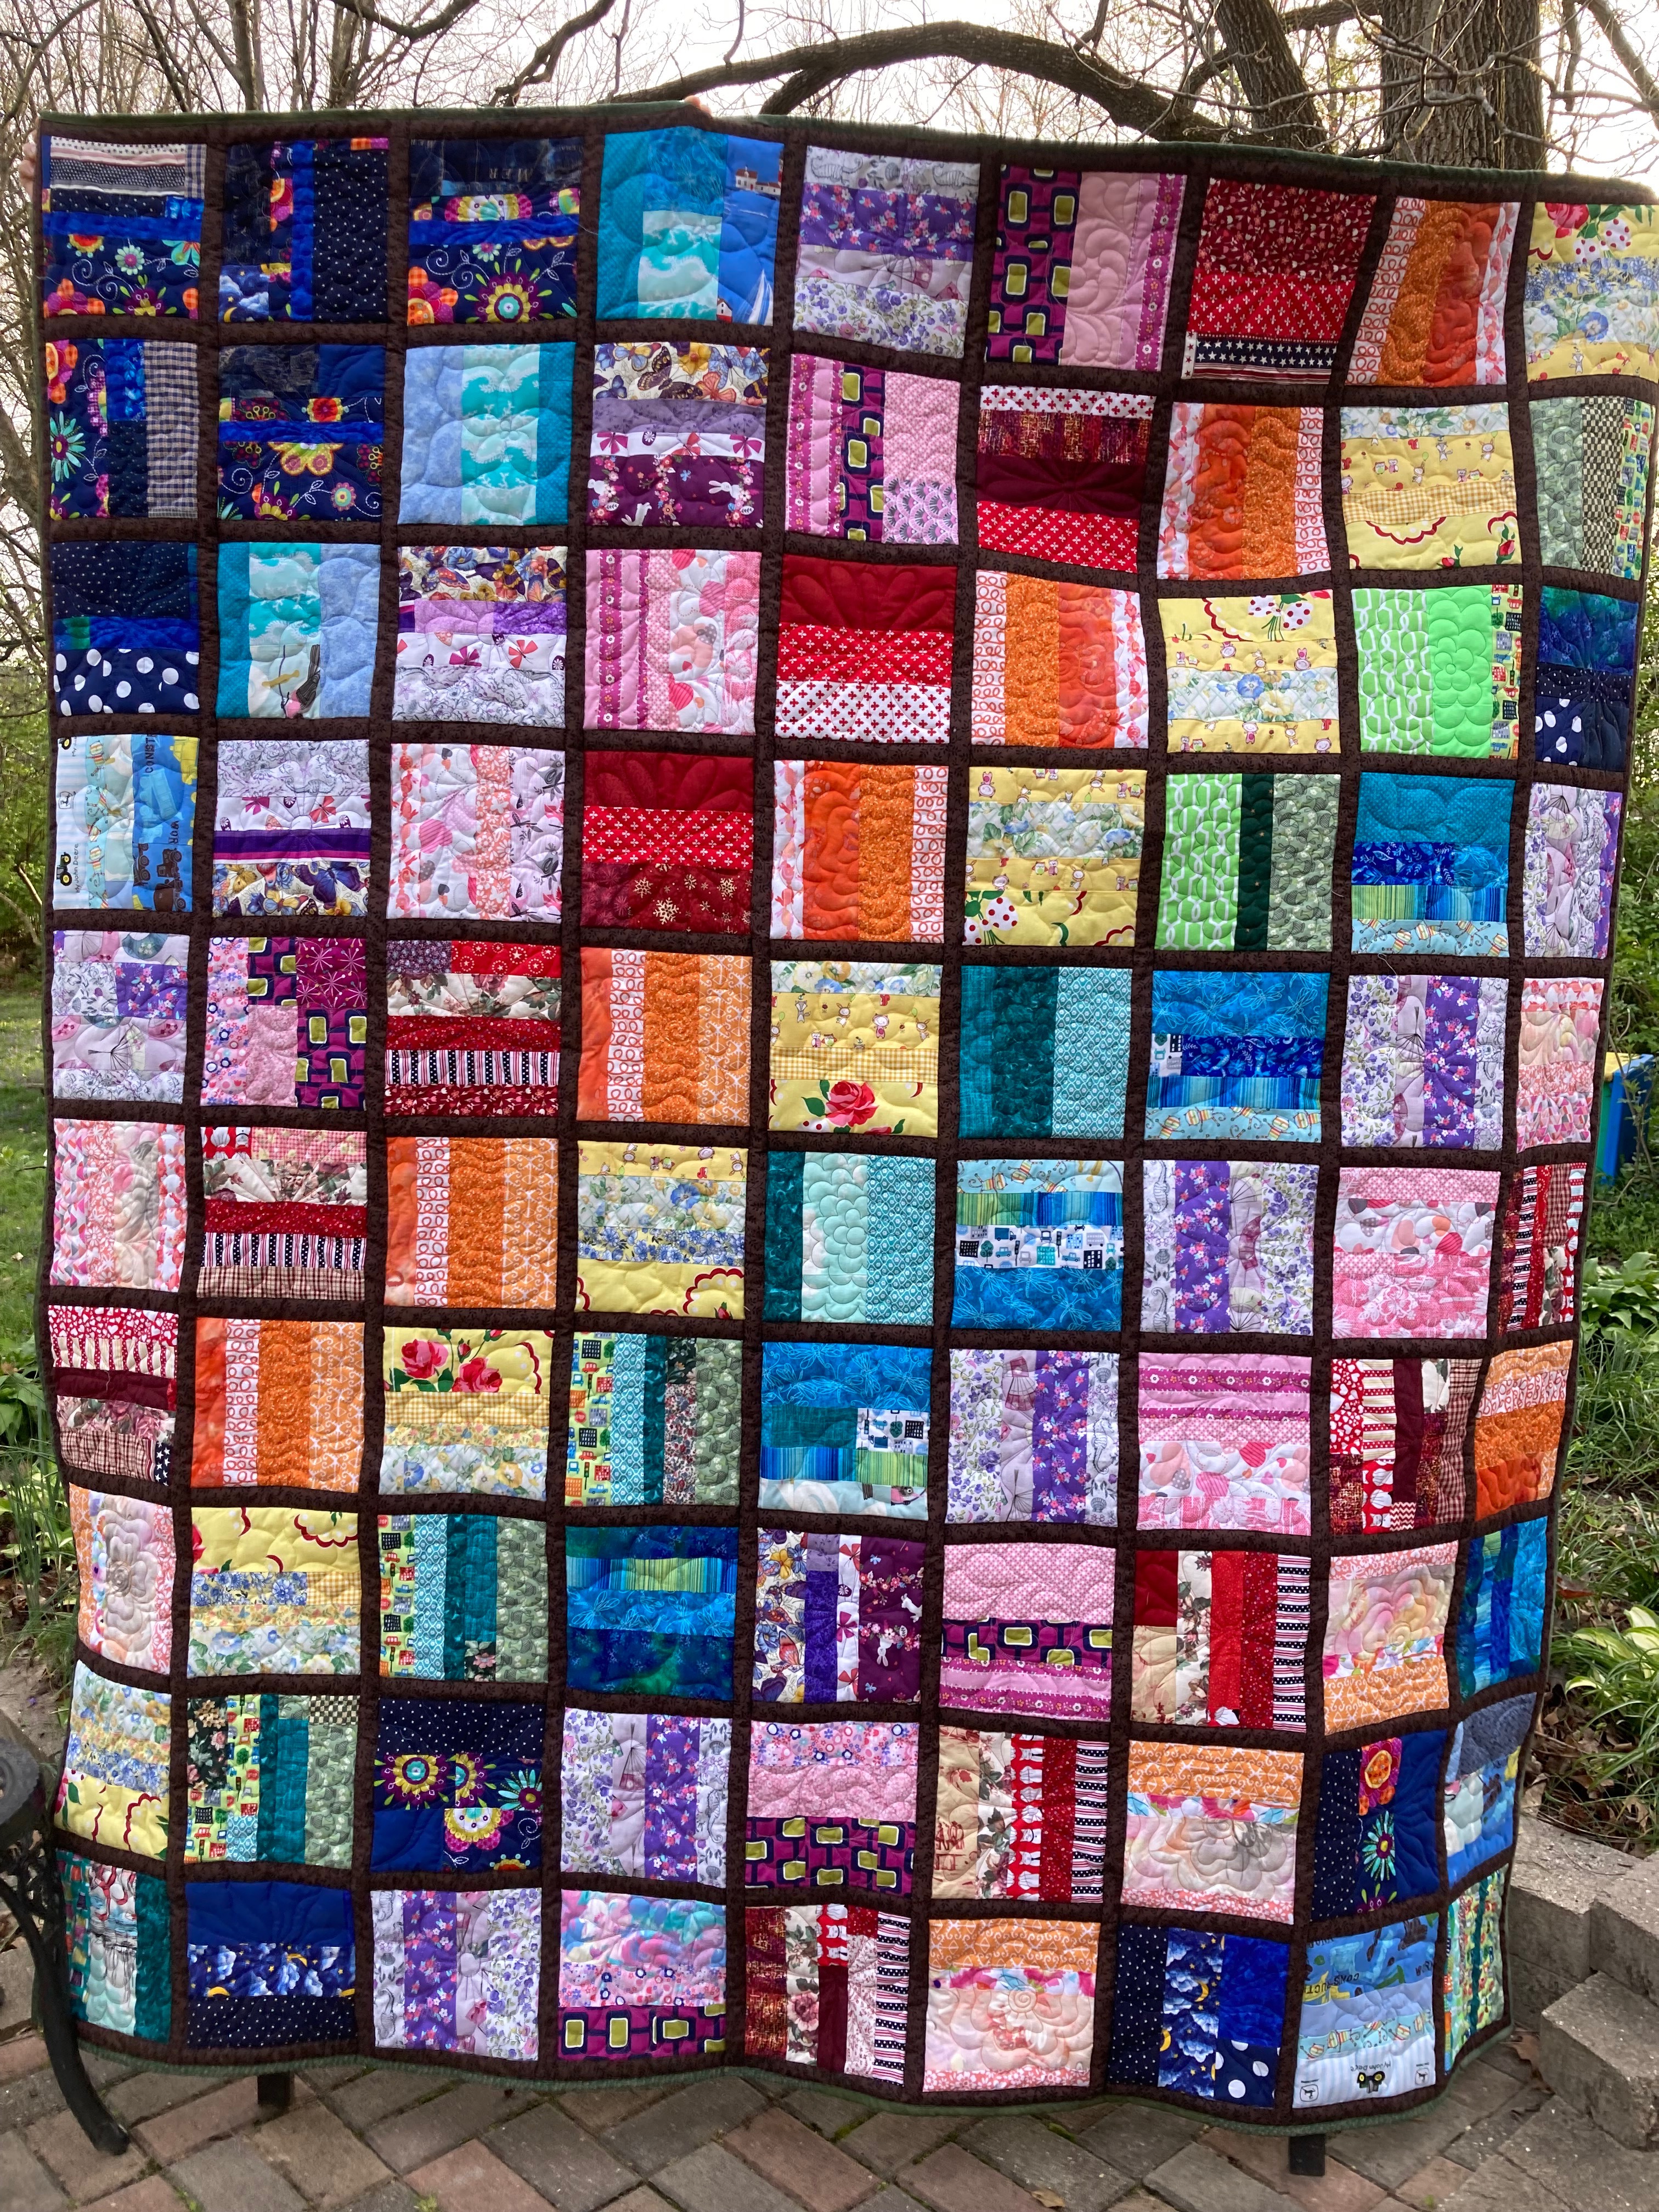
I keep a running list of quilts to make and it often takes years for me to get around to making them. This is one I designed over 12 years ago. If Porter, my 7th child, had been a girl, this was the one I planned to make him. So it was to be made for my 8th child that never happened. When I decided to make both a baby quilt and matching queen/king sized quilt for my grandchildren, as I had my own kids, I figured I’d still make it sometime.


I have 3 sets of tops for future grandkids on my to do list this year (which may be overly ambitious). This is the first set, finally done after years of planning and 3 months of work. I will quilt them when there’s a grandchild to receive them. Even though I just finished making these tops, my daughter has requested this for her daughter due in the fall.
 

This pattern was deceptively hard. That is because the center strip in each of the squares has to line up precisely where the seam is going to be, but because of the angle, that is not actually corner to corner from the cut edges. I’m proud of the pattern, but I don’t think I would choose to make this one again. I prefer patterns that look hard, but are really easy.

However, since there may be some that want to attempt this beauty, here is how you can make your own paper pieced pattern for this. This can be adjusted to any size finished block you wish to make. These blocks finished to 6" squares. There are many instructions on how to do paper piecing, so I will not go into that at this time. I used a reusable paper method (can be done with freezer paper, though I used my Xyron 900 to make my paper into stickers, which worked for me).

You will need two different patterns. The second is a mirror image of the first. Here's how you make it.


Draw a 6" square. Draw in seam allowance around the perimeter - I use 1/4" seam. I'm using graph paper to help show the sizing.


I found a ruler that was 1" wide, so I'm using that to draw my lines. I want the diagonal line to be 1" wide. You, of course, could choose a different width. The concept will be the same, though.


I want the diagonal line to match the corner of the INSIDE square with the edge of one side of the ruler, and the opposite corner to touch the other side of the ruler. You will notice that the line intersecting the corner of the inside square does NOT touch the corner of the outside square. That is as it should be. You will need a mirror image of this pattern. 


For figuring out how many of each type of square I needed, I drew out my plan. As you can see I made alterations, but you can see some of my numbers and sketches. Each diamond is made of two darks with light stripes and two mirror image lights with dark stripes. There are vertical and horizontal diamonds. The vertical diamond will use (if looking at my little key under the drawn quilt below) the top left and bottom right squares, while the horizontal will use the top right and bottom left.


Hope that helps. As I said, this pattern was deceptively harder than I thought it should be. You have to keep your brain in gear. I found it helpful to sew them together as diamonds first and then arrange them on the floor or design wall. It's much too easy to pick up the wrong piece or lay them out in the wrong way. Ask me how I know. I'm not a fan of using my seam ripper. I would much rather it sit nicely in my drawer and leave me alone.


Friday, June 3, 2022

Dana's Sunbonnet Sue


I spent a week working on this antique quilt for Dana. I leave the story of it to her words below. Using a cream colored thread (Glide and Glide 60), I outlined the blocks and girls and filled the background with an all over meander. A few lines in the sashing kept it simple and let the girls shine. Warm and Natural batting was essential for leaving the girls unquilted.


There were a few minor repairs, like this arm that had become unstitched which I hand stitched closed.


Dana: "My Grandmother was an Home Ec and English teacher in the 40s and 50s. In 1939 she had each student do a quilt square of “Sun Bonnet Sue.” She pieced them together and made several squares to round out a double size quilt.


"I inherited the quilt top when she passed away almost 30 years ago. With the help of Suzie B., I found Virginia Smith of Show Me Sewing. I am over the moon to finally have this completed.


"I love the Heather Bailey fabric I chose for the back and the hot pink binding that Virginia recommended. She was so helpful in helping me choose the quilting patterns that would work the best. She is amazing!
I had the best nap EVER under this blanket this afternoon. I’m so thankful to have this completed in such a perfect way!!"


Dana, It was my pleasure!