I want to share with you what I do in hand quilting, particularly the beginning and ending with hiding the knots in the quilt. I have done the regular things that I was taught, both as a child as well as seeing it on others blogs of just popping the knot into the quilt so it's caught in the batting in the center of the quilt sandwich. At the end, they tell you to make a knot and pop the knot inside again. I'm all for hiding the knot inside, but since I use my quilts on my bed, there is wear and movement on the quilt and I have had those knots rear their ugly heads and even come undone after they are on the outside of the quilt. I have also tried the method of no knots, just sewing back and forth (basically back stitching by hand). Both ways I have had problem with so I now have my own variation.
These are the things I have discovered to help keep those knots stay inside as well as having enough of the thread going through the batting so I don't see those knots again, nor have them undo. I took lots of pictures, so I hope that helps make it clear. It certainly makes it long. Obviously, I'm left handed. For all ye righties out there, mirror what I'm doing. You can do it. Please pardon my fingernails - I was helping with Scouting for Food and was showing my support.
My mother taught me that because of the twist of the thread, one should always tie the knot, then cut the thread. This will help prevent unwanted knots in the thread as you quilt. I do not know if this is still the case, but I continue to do it. I'm all for anything that will prevent having to undo knots.
Here is how I tie a knot. Holding the end of the thread with my thumb, between my thumb and forefinger, wrap the thread around your finger until the thread crosses the first (I'm exaggerating the X in Fig.1, you don't want it to be quite so pronounced). Where your thumb is holding, now two strings, begin rolling the thread off your finger with your thumb, the threads twist like in Fig 2.
As soon as it rolls all the way off your index finger and you're holding it with the tip of your index finger and thumb, catch the thread above the twist between your middle finger and thumb (Fig. 3) and slide the twist in the thread back towards the end of the thread, moving your index finger when necessary and when you're sure the knot will stay on the thread. (Fig. 4)
I keep a knot on the spool. When I cut myself another thread, I then tie a knot back on the spool (there is already one on the thread I will use). (Fig 5) This makes it so I don't have to remember to tie the knot first, then cut the string as my mother instructed me. I still do it in the order I was accustomed to. Next I thread the needle. (Fig. 6)
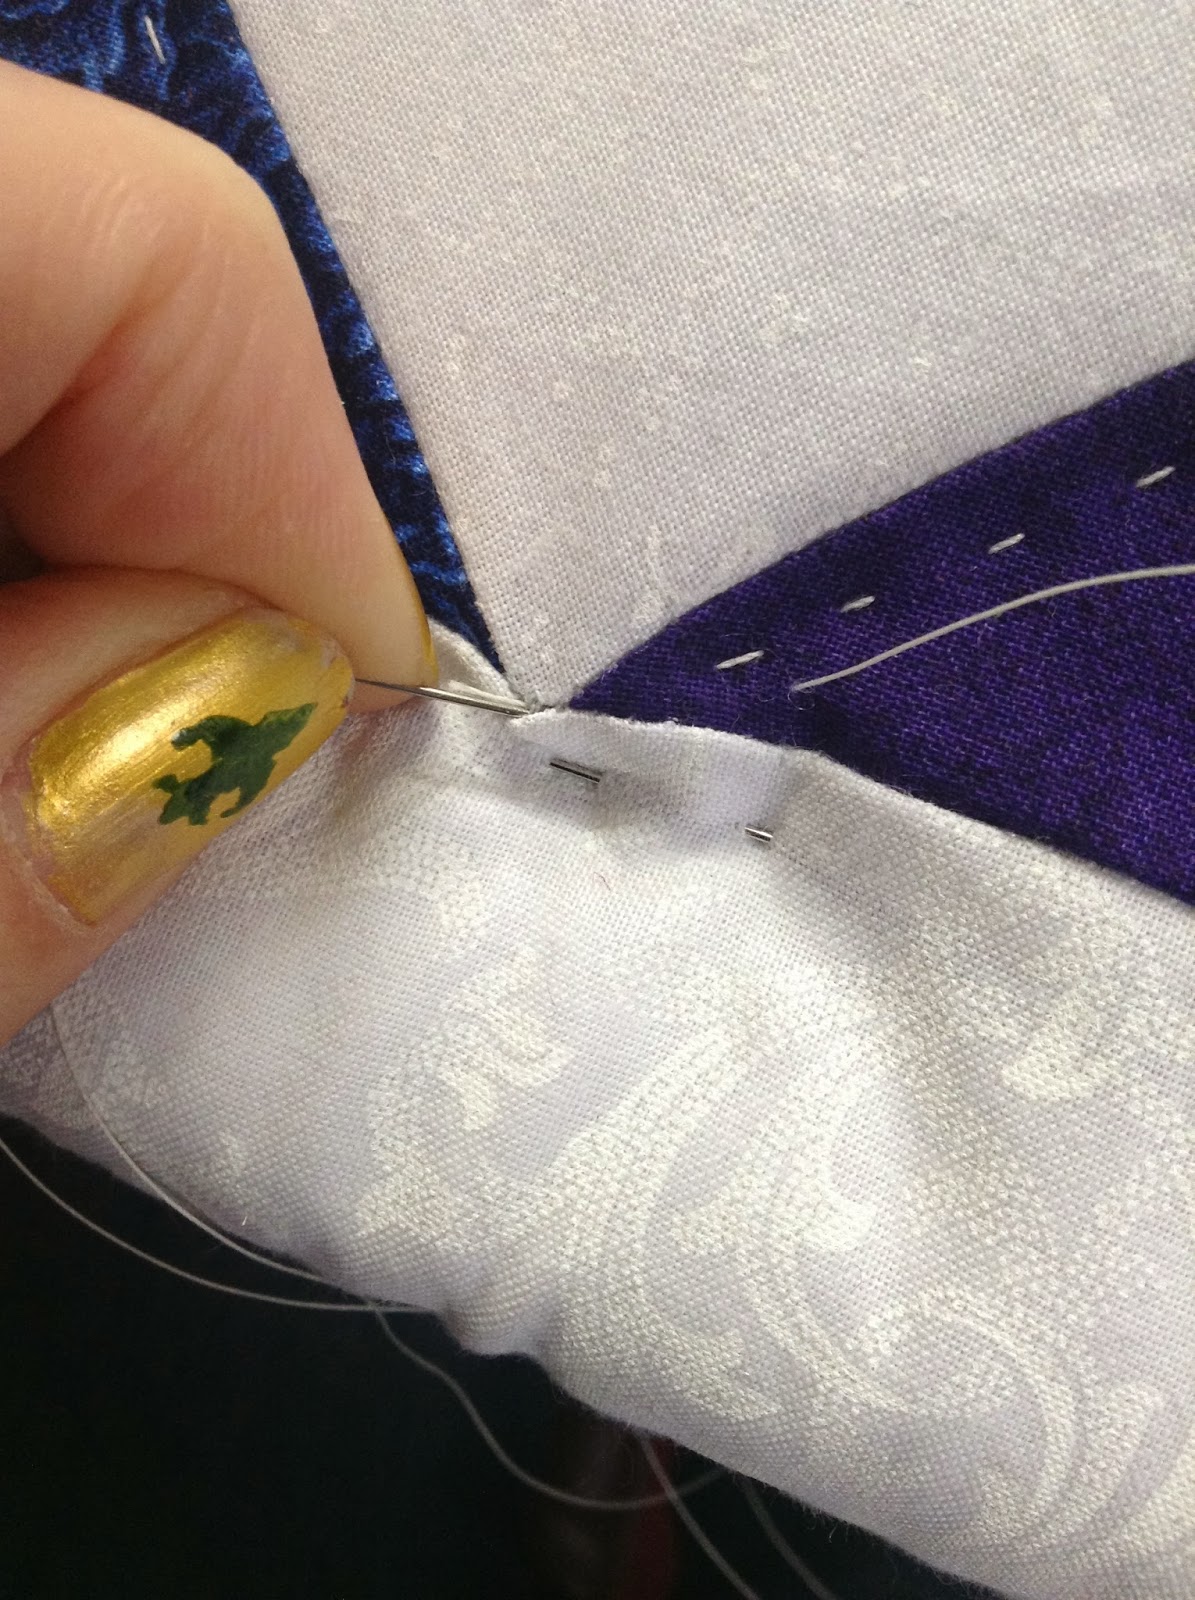
Here's where I change the rules a bit. Rather than just poking my needle in any old place near my starting location, I try to find a seam approximately half the needle's length (or more) away from where I'm going to begin. (Fig. 7). My goal is to run the quilting thread and knot between the machine sewn threads, as well as between the layers of fabric. Why? Because when I try and pop the knot through the fabric, far too many times, it snags the fabric, even when I very carefully put the needle between the threads of the material. So, finding a place to gently wiggle in my needle, far enough that when I "pop" the knot in, it will disappear, I begin weaving the needle up and down inside the quilt sandwich, catching seam allowances and batting to keep the knot from moving. I then bring the needle out on the top of the quilt in the exact location I wish to begin quilting. (Fig. 8).
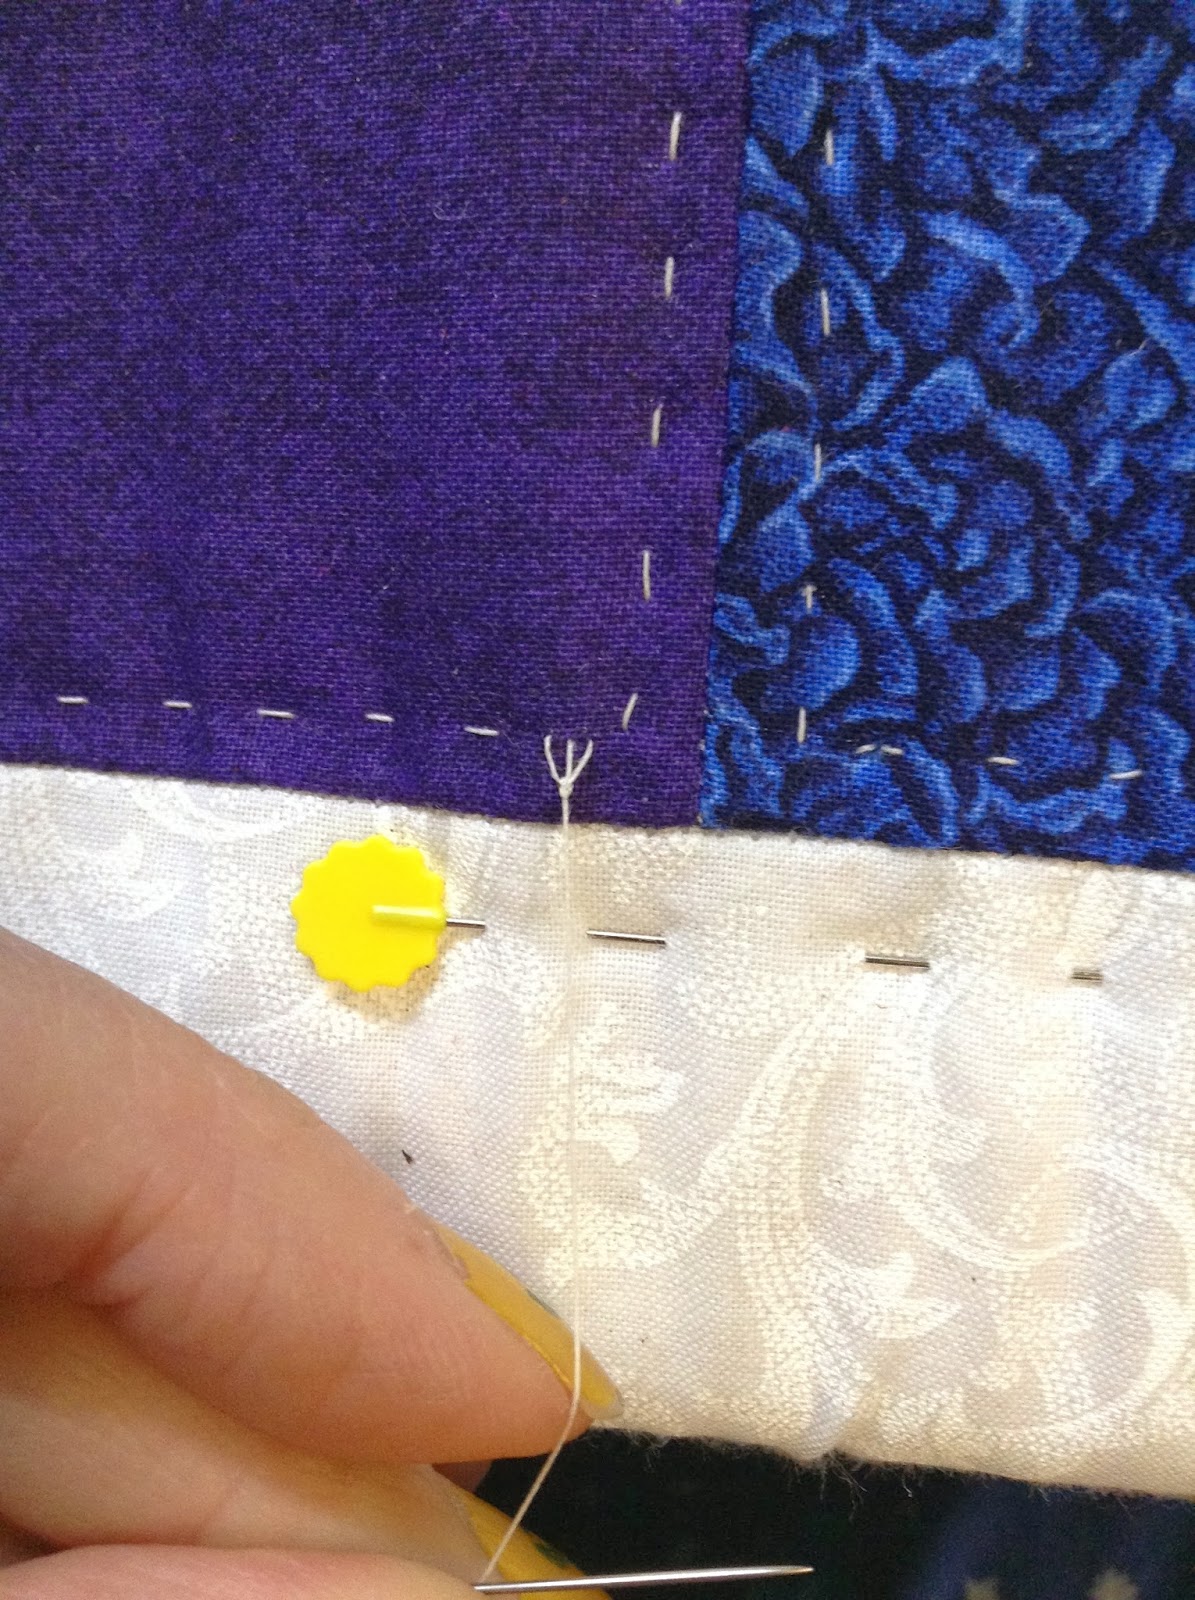
Next I pop the knot inside the quilt by gently tugging on the thread. (Fig. 9). Sometimes, the knot doesn't want to easily pop in. When this happens, I use my needle to ease open the area I want the knot to enter. Sometimes trying to "open the door wider" and sometimes "shoving from behind" with the needle.
This knot was very obliging in being obstinate so that I could show you more techniques. In Fig. 10, I'm trying to open the area more to get the knot through. In Fig. 11, I'm poking it in. It then left a tail hanging out, so after poking it in as much as I could from the entrance hole, (Fig. 12), I then partially inserted the needle a short distance away from where the internal thread should be and with a sweeping motion of the needle, I caught the thread with the needle and pull it all the way inside, from the inside. Shown in Fig. 13. There are better pictures of this at the end of the post (Fig. 29-31).
Next you are ready to quilt. Taking a small stitch from where you started, poke the needle through the quilt enough so that you feel the point coming through the back. Still holding on to the needle on top of the quilt, bring the needle point to the top so you've taken a stitch on the bottom side of the quilt. Repeat. The stitches on top and bottom should be the same size in length.
If you are just beginning, you may feel more comfortable taking only one stitch like this at a time, pulling the needle and thread through the fabric before repeating. As you become more comfortable, you will be able to rock the needle up and down to take multiple stitches before pulling the needle and thread all the way through. (Fig. 14)
Sometimes, I have a hard time grabbing onto the needle to pull it through. In times like these, my best friend in the whole wide world is this tool - forceps. (Fig. 15) I have some with both a curved end and straight. Both work fabulously. I don't know how life existed before I got some.
Now to tie the knot. I begin by bringing the needle up at the end of a stitch just a tiny smidgeon beyond where I normally would and take care to bring the needle out between the threads in the fabric. Next you are going to take a stitch, only on the top layer of fabric, starting on one side of the thread and coming out on the other. If you were sewing from left to right (as in Fig. 16), you begin on the left of the thread and come out exactly the same distance on the other side of the thread. Pull the needle until you have a little loop at the end. (See Fig. 17).
Put your needle through that loop, then wrap the long end of the thread around the needle. (Fig. 18) Pull the needle through. Pull until you have a knot. It will look like a tiny trident. (Fig. 19)
Repeat, putting the needle through the same loop, wrapping the thread around the needle in the same direction as before (Fig. 20) and pulling to tighten. (Fig. 21) The knots should be together at the base of the tines of the trident.
Here comes the fun part. Okay, maybe not so fun. I hope your eyes are better than mine. Insert the point of the needle exactly through the same hole as the middle thread. (Fig. 22) It has to be exact or the knot won't "pop" in and disappear and if you were not careful to bring the needle up between the woven threads of the cloth, it will be even harder to find your hole. I pull the threads around to try and get the best view and use my needle to try and run right along the edge of the thread coming out the hole. Once I'm sure I'm in the right place, I run my needle as far as I can, while at the same time weaving it up and down through the batting to help secure it. (Fig. 23)
Pulling on the thread, (Fig. 24) I pop the knot inside the quilt sandwich. (Fig. 25). Because of the trident, there is just enough thread to have the knot be in the fabric and not keep the tension on the thread where it popped in. Let's get rid of that little tent that it looks like now in the photo.
Simple solution: Using the needle, gently pull those threads back just enough that they lay straight and look more like a regular stitch from a distance. (Fig. 26). Sometimes I will do some extra weaving thread inside the quilt (can be done at the beginning as well as the end) so there is an ample tail inside, or so I can come in at a seam rather than the middle of a block. Again you are carefully putting the needle down through the same hole the thread is coming out of and weaving the the needle through the batting. (Fig. 27) As you see, I switched directions. I like to think that this makes it less likely for the thread move around.
Next cut the thread close to the fabric. (Fig. 28) When I did this, because I was trying to take a picture at the same time, I ended up with a little more thread sticking out than I normally do, but not to worry. That gives me the chance of showing you again how to pull the thread into the center with the needle. (Fig. 29, 30, 31). Observe how the needle moves and the thread disappears.
If you cut the thread close to the fabric, you only need to rub the end of the thread to make it disappear inside. (Fig. 32) Et, voila! Karina's quilt is coming along. (Fig. 33)
These are the things I have discovered to help keep those knots stay inside as well as having enough of the thread going through the batting so I don't see those knots again, nor have them undo. I took lots of pictures, so I hope that helps make it clear. It certainly makes it long. Obviously, I'm left handed. For all ye righties out there, mirror what I'm doing. You can do it. Please pardon my fingernails - I was helping with Scouting for Food and was showing my support.
 |
| Fig.1 |
 |
| Fig. 2 |
My mother taught me that because of the twist of the thread, one should always tie the knot, then cut the thread. This will help prevent unwanted knots in the thread as you quilt. I do not know if this is still the case, but I continue to do it. I'm all for anything that will prevent having to undo knots.
Here is how I tie a knot. Holding the end of the thread with my thumb, between my thumb and forefinger, wrap the thread around your finger until the thread crosses the first (I'm exaggerating the X in Fig.1, you don't want it to be quite so pronounced). Where your thumb is holding, now two strings, begin rolling the thread off your finger with your thumb, the threads twist like in Fig 2.
 |
| Fig. 3 |
 |
| Fig. 4 |
As soon as it rolls all the way off your index finger and you're holding it with the tip of your index finger and thumb, catch the thread above the twist between your middle finger and thumb (Fig. 3) and slide the twist in the thread back towards the end of the thread, moving your index finger when necessary and when you're sure the knot will stay on the thread. (Fig. 4)
 |
| Fig. 5 |
 |
| Fig. 6 |
I keep a knot on the spool. When I cut myself another thread, I then tie a knot back on the spool (there is already one on the thread I will use). (Fig 5) This makes it so I don't have to remember to tie the knot first, then cut the string as my mother instructed me. I still do it in the order I was accustomed to. Next I thread the needle. (Fig. 6)
 |
| Fig. 7 |
 |
| Fig. 8 |
Here's where I change the rules a bit. Rather than just poking my needle in any old place near my starting location, I try to find a seam approximately half the needle's length (or more) away from where I'm going to begin. (Fig. 7). My goal is to run the quilting thread and knot between the machine sewn threads, as well as between the layers of fabric. Why? Because when I try and pop the knot through the fabric, far too many times, it snags the fabric, even when I very carefully put the needle between the threads of the material. So, finding a place to gently wiggle in my needle, far enough that when I "pop" the knot in, it will disappear, I begin weaving the needle up and down inside the quilt sandwich, catching seam allowances and batting to keep the knot from moving. I then bring the needle out on the top of the quilt in the exact location I wish to begin quilting. (Fig. 8).
 |
| Fig. 9 |
 |
| Fig. 10 |
Next I pop the knot inside the quilt by gently tugging on the thread. (Fig. 9). Sometimes, the knot doesn't want to easily pop in. When this happens, I use my needle to ease open the area I want the knot to enter. Sometimes trying to "open the door wider" and sometimes "shoving from behind" with the needle.
 |
| Fig. 11 |
 |
| Fig. 12 |
This knot was very obliging in being obstinate so that I could show you more techniques. In Fig. 10, I'm trying to open the area more to get the knot through. In Fig. 11, I'm poking it in. It then left a tail hanging out, so after poking it in as much as I could from the entrance hole, (Fig. 12), I then partially inserted the needle a short distance away from where the internal thread should be and with a sweeping motion of the needle, I caught the thread with the needle and pull it all the way inside, from the inside. Shown in Fig. 13. There are better pictures of this at the end of the post (Fig. 29-31).
 |
| Fig. 13 |
Next you are ready to quilt. Taking a small stitch from where you started, poke the needle through the quilt enough so that you feel the point coming through the back. Still holding on to the needle on top of the quilt, bring the needle point to the top so you've taken a stitch on the bottom side of the quilt. Repeat. The stitches on top and bottom should be the same size in length.
 |
| Fig. 14 |
 |
| Fig. 15 |
If you are just beginning, you may feel more comfortable taking only one stitch like this at a time, pulling the needle and thread through the fabric before repeating. As you become more comfortable, you will be able to rock the needle up and down to take multiple stitches before pulling the needle and thread all the way through. (Fig. 14)
Sometimes, I have a hard time grabbing onto the needle to pull it through. In times like these, my best friend in the whole wide world is this tool - forceps. (Fig. 15) I have some with both a curved end and straight. Both work fabulously. I don't know how life existed before I got some.
 |
| Fig. 16 |
 |
| Fig. 17 |
Now to tie the knot. I begin by bringing the needle up at the end of a stitch just a tiny smidgeon beyond where I normally would and take care to bring the needle out between the threads in the fabric. Next you are going to take a stitch, only on the top layer of fabric, starting on one side of the thread and coming out on the other. If you were sewing from left to right (as in Fig. 16), you begin on the left of the thread and come out exactly the same distance on the other side of the thread. Pull the needle until you have a little loop at the end. (See Fig. 17).
 |
| Fig. 18 |
 |
| Fig. 19 |
Put your needle through that loop, then wrap the long end of the thread around the needle. (Fig. 18) Pull the needle through. Pull until you have a knot. It will look like a tiny trident. (Fig. 19)
 |
| Fig. 20 |
 |
| Fig. 21 |
Repeat, putting the needle through the same loop, wrapping the thread around the needle in the same direction as before (Fig. 20) and pulling to tighten. (Fig. 21) The knots should be together at the base of the tines of the trident.
 |
| Fig. 22 |
 |
| Fig 23 |
Here comes the fun part. Okay, maybe not so fun. I hope your eyes are better than mine. Insert the point of the needle exactly through the same hole as the middle thread. (Fig. 22) It has to be exact or the knot won't "pop" in and disappear and if you were not careful to bring the needle up between the woven threads of the cloth, it will be even harder to find your hole. I pull the threads around to try and get the best view and use my needle to try and run right along the edge of the thread coming out the hole. Once I'm sure I'm in the right place, I run my needle as far as I can, while at the same time weaving it up and down through the batting to help secure it. (Fig. 23)
 |
| Fig. 24 |
 |
| Fig. 25 |
Pulling on the thread, (Fig. 24) I pop the knot inside the quilt sandwich. (Fig. 25). Because of the trident, there is just enough thread to have the knot be in the fabric and not keep the tension on the thread where it popped in. Let's get rid of that little tent that it looks like now in the photo.
 |
| Fig. 26 |
 |
| Fig. 27 |
Simple solution: Using the needle, gently pull those threads back just enough that they lay straight and look more like a regular stitch from a distance. (Fig. 26). Sometimes I will do some extra weaving thread inside the quilt (can be done at the beginning as well as the end) so there is an ample tail inside, or so I can come in at a seam rather than the middle of a block. Again you are carefully putting the needle down through the same hole the thread is coming out of and weaving the the needle through the batting. (Fig. 27) As you see, I switched directions. I like to think that this makes it less likely for the thread move around.
 |
| Fig. 28 |
 |
| Fig. 29 |
Next cut the thread close to the fabric. (Fig. 28) When I did this, because I was trying to take a picture at the same time, I ended up with a little more thread sticking out than I normally do, but not to worry. That gives me the chance of showing you again how to pull the thread into the center with the needle. (Fig. 29, 30, 31). Observe how the needle moves and the thread disappears.
 |
| Fig. 30 |
 |
| Fig. 31 |
 |
| Fig. 32 |
 |
| Fig. 33 |
If you cut the thread close to the fabric, you only need to rub the end of the thread to make it disappear inside. (Fig. 32) Et, voila! Karina's quilt is coming along. (Fig. 33)


