
I then learned that if you used a little scrap of fabric - about 1-1.5" wide and sewed over that at the end of the chain, you had all the benefits of chain piecing indefinitely. Cool. I was converted to the method.
Then as I was reading a quilting book (Cut the Scraps! by Joan Ford, pg. 35), she mentioned how she always had 2 projects going at once. The main one and a secondary one that was done over a long period of time. Here's how it works.
 You are sewing along and come to a place where you need to remove
your sewing from the machine. You reach into your little box of pre-cut
pieces and sew a couple together, using these as your holder while you
remove your sewing project. When you begin sewing again, remove the
secondary project and put it off to the side.
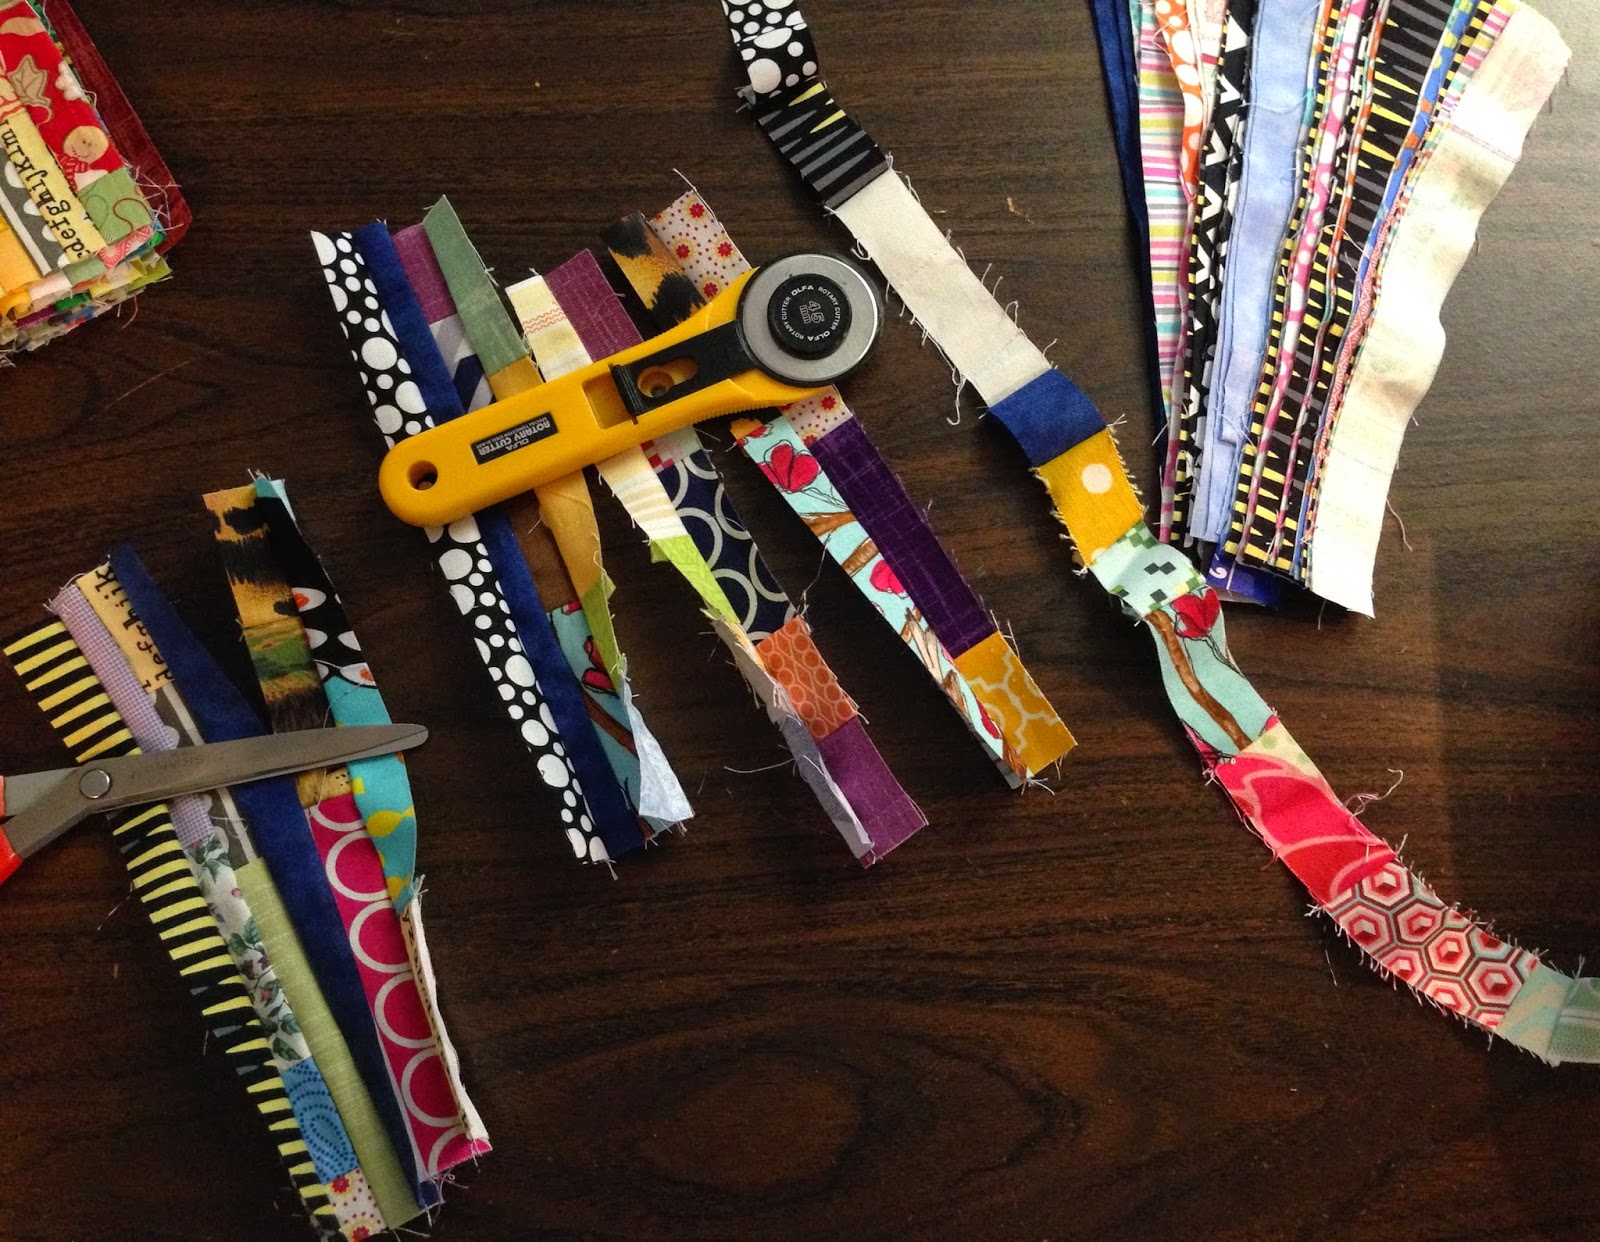
You are sewing along and come to a place where you need to remove
your sewing from the machine. You reach into your little box of pre-cut
pieces and sew a couple together, using these as your holder while you
remove your sewing project. When you begin sewing again, remove the
secondary project and put it off to the side.This first photo is of two scraps I am sewing together to make longer strips. When I have sewn these together, I can remove the black thing behind it that I was sewing.
 The second photo is of a little plastic container I use to contain my secondary project. In this case, I began accumulating 1" strips - things that others were throwing away and I thought, "Surely something can be made from these!" I think that it's much easier to do this if the secondary project is purely scrappy in design. You don't want to have to keep two projects in mind and remember which one you are working on.
One inch strips may not be your cup of tea, but choose some scrap project - especially if it's a "grab bag" style, and you can put those scraps to good use.
See finished quilt here.
My scrap basket is overflowing so I started cutting my strips last night. I can't wait to see how far I can get today. What a great idea
ReplyDeleteThelma Richards
Thanks and Good luck. I just posted and linked to the finished quilts tops made with these 1" strips. And I already have more 1" strips. "One man's trash is another man's treasure." the old saying goes. This was definitely the case for me here.
DeleteWhere did you post the link? I didn’t see it in the April blogs.
DeleteYou should be able to click the "here" at the bottom and it would take you there. If that doesn't work, it was posted on the April 19, 2021.
DeleteI think this is a fantastic idea I think I will start doing this as throw so many small pieces out and waste a lot of cotton to thank you for this so kind of you for sharing kind regards Claire
ReplyDeleteDid you know you can always use tiny scraps for stuffing dog beds made out of pillow cases .. stuff them with scraps .. not as fat as a pillow but enough to cushion the pet from cold flooring & give to to vet or animal shelter..
DeleteSo many things to do with scraps! Good luck! Scrap quilts take a lot more time, but it's so fun to see something so useful and pretty made from "trash."
ReplyDeleteI’m not a quilter but think I can tackle the piecing. But how??? How did you do the black background when all of the blocks were not oriented the same direction and size ?
ReplyDeleteThe black background is an illusion. I didn't have the black in the original plan, so the blocks above are 8-1/2" square using 16 strips. In the final I took off 3 of those strips, using only 13, then added a slightly larger set of black strips on either side - still making a 8-1/2" unfinished square. Then when the squares are sewn with the strips going vertically, horizontally, vertically, etc. the black on the sides of each block give the illusion of a black background, but it really is part of your block and you're just sewing squares together. I posted a link with instructions on how I finished it in the link at the very end. Does that make sense?
ReplyDeleteBeautiful! The black sashing makes it all pop!
ReplyDeleteAwesome. I have just started cutting my scrap fabric into strips which I will sew together and make into squares. So excited to see how it will look when I finally get it finished. Thanks for your ideas 🙂
ReplyDeleteGood luck! I'd love to see how it turns out when you are done.
DeleteThis is why I don't throw those extra bits away! I love looking at blocks and think about where I bought the fabric and which project I used it in. Scrap quilts also remind me of great quilts that practically sewed themselves, and ones that took practically took two seam rippers. In my second quilt I am using
ReplyDelete6" flannel blocks to sew the strips on to, scraps from another project.My plan is to make 1 block per week so the quilt that might take a few years but sew far sew good, pun intended. I am sewing the pieces onto flannel squares from an baby shower quilt for extra warmth and stability. Happy sewing everyone!
I totally agree! Good luck to you!
DeleteThis is a wonderful idea, i will be try ing it Thank You
ReplyDeleteLove this idea! Would love to see picture of finished quilt, please😊
ReplyDeleteAt the bottom of the post there was a link to the finished quilt. You could also search for the post on 19 April 2021 if that doesn't work.
DeleteHow are you sew all together?
ReplyDeleteAt the very bottom of the post is a link to the finished quilt. You could also search for the post on 19 April 2021 if that doesn't work.
ReplyDelete